
VRS Roundtrip Testing Guide
CARO Test Environment Guide for VRS
This document describes the CARO account set-up for testing by VRS providers.
Please follow the instructions in the API Documentation for VRS providers to use and configure the required APIs.
This document will be updated continuously. Please check back frequently, as new features and functionalities will be added to the application and explained here.
Development Status
The current application is a production version, which is continuously being developed further.
We would love to hear your feedback. Which functionalities or info screens are useful to you? What should we add or remove? How can we make your life easier? Please get in touch through one of the means detailed at the bottom of this page.
VRS Test Account Set-up
In practice, a VRS provider needs to be granted access by their customer into their trading partner account. Subsequently, VRS can access the account via the APIs VP Generation and VP Verification.
For testing purposes, we take a short-cut. Spherity provides you with two mock trading partner accounts to mimic both the requester and the responder roles. The requester account represents wholesalers (or dispensers) sending a Product Identifier (PI) Verification request. The responder account represents manufacturers responding to a PI Verification request. In each account you can find the test trading partner decentralized identifiers (DID). Each unique identifier effectively represents a specific imaginary trading partner within the system.
ONLY for API endpoint testing has Spherity created DSCSA ATP test credentials within our system for both requester and responder accounts. Note that these test credentials have not been issued by our integrated Credential Issuer, Legisym, as this is not required for API endpoint testing.
The web app resides on app.caro.vc. Using the email address provided by you, we will invite you to your test accounts. You will then be able to log in and start testing.
CARO Host
Be sure to use api.caro.vc as the host when testing verifiable presentations.
Test Scenarios
OCI has scoped relevant credentialing test cases. Spherity continues to be actively involved in this process. We update CARO as needed to accommodate changing recommendations.
As it stands, CARO enables testing based on:
- valid ATP credential
- expired ATP credential
- revoked ATP credential
- invalid issuance date of ATP credential
- invalid issuer of ATP credential
- invalid proof (i.e. invalid signature in ATP credential)
- no ATP credential
Each of these scenarios is associated with its own DID. Thus, by choosing a DID, you also select its directly associated verifiable credential (VC). The DID naming in our CARO test set-up indicates the state of the credential, i.e. valid or invalid.
Both the requester and responder test accounts enable the same set of test cases. This allows you to test success and failure scenarios on either side of the VRS roundtrip, i.e. the requestor and responder side, depending on the chosen DIDs per test run.
The requester and responder DIDs with an associated valid ATP credential will enable a test of the happy path scenario, i.e. a complete successful VRS roundtrip. Use of any other DID will result in an error message as specified by OCI's Digital Wallet Conformance Criteria.
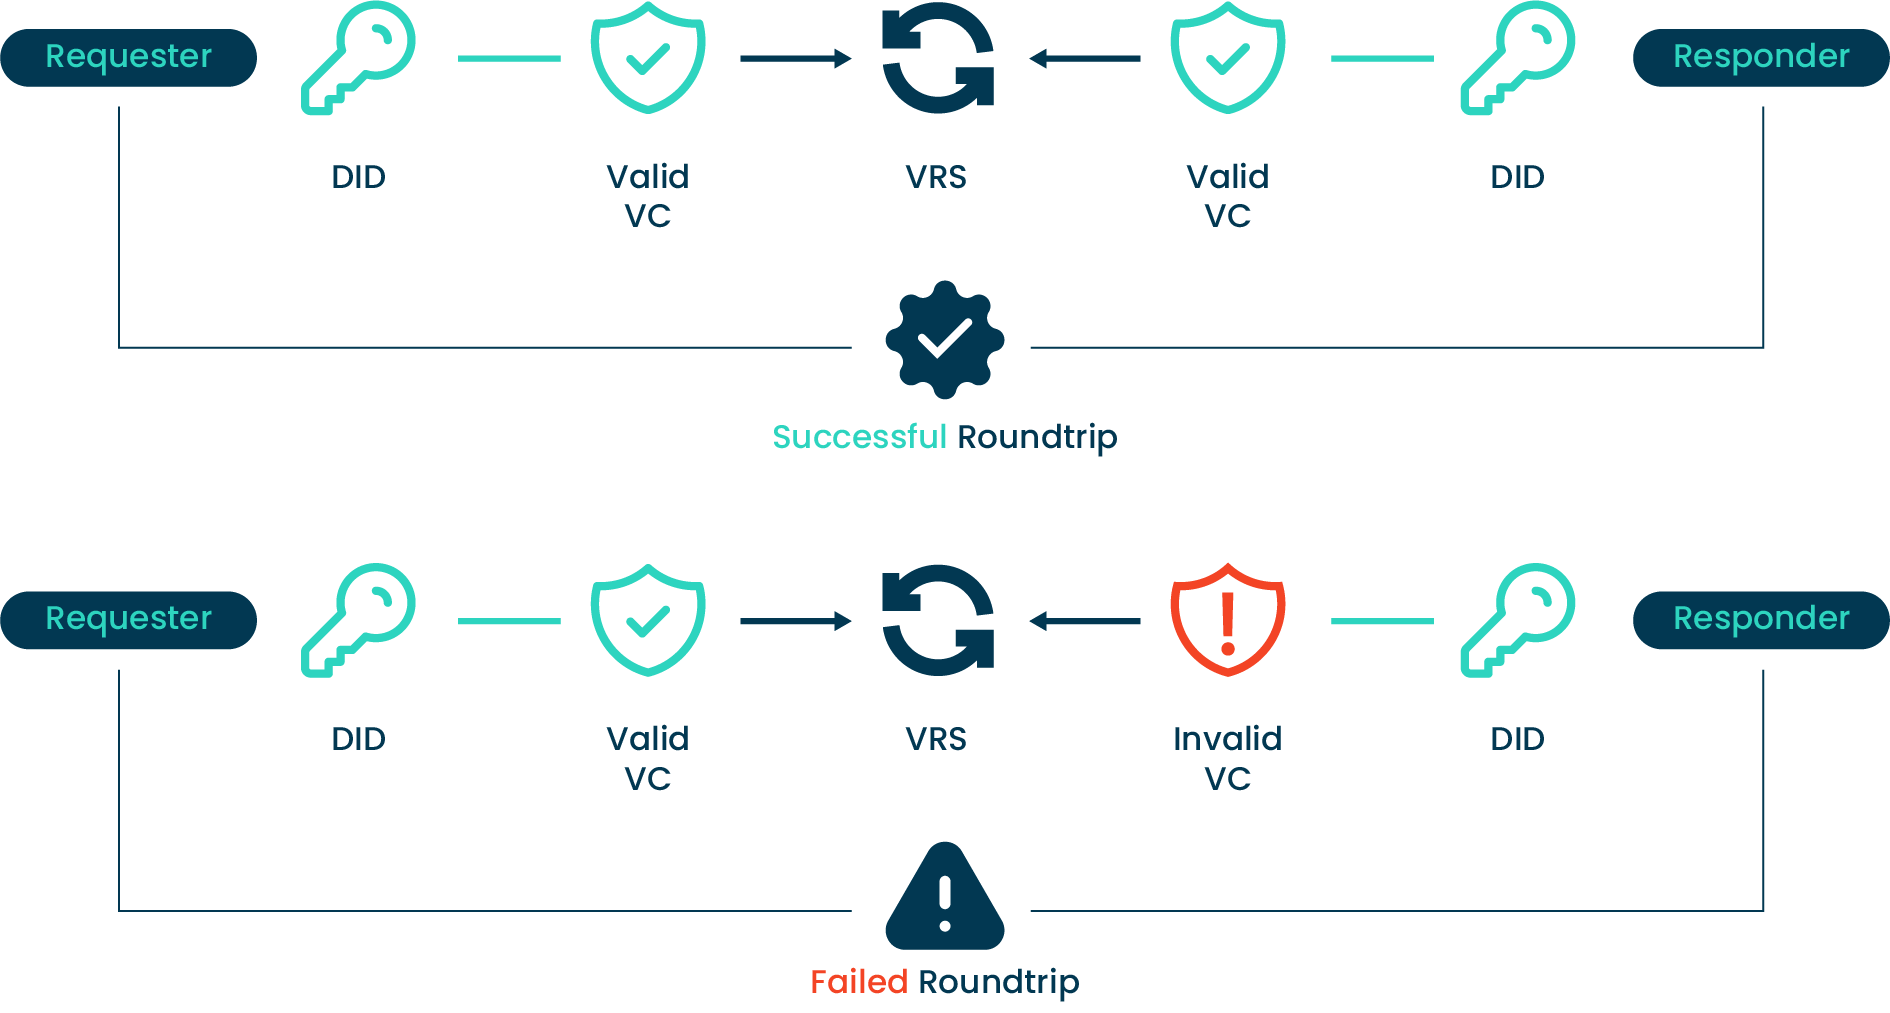
Here is an illustration of two roundtrip scenarios:
- successful VRS roundtrip, as both requester and responder have valid credentials
- failed VRS roundtrip, as the responder has an invalid credential (CARO will throw an OCI-specified error)
Please note
- The list of provided DIDs in your CARO trading partner account includes an issuer DID. Please ignore this DID as a VRS tester.
- Whilst the current test set-up includes the above-mentioned ATP credentials, identity credentials have not been pre-populated, as this is not required for API endpoint testing.
Testing Process Flow
- Decide which DID in the requester and responder accounts to use depending on the scenario you want to test.
- Generate the Verifiable Presentation (VP) of the DSCSA ATP Credential by calling the VP Generation API. Refer to our API documentation for details.
- Verify the VP of the DSCSA ATP Credential by calling the VP Verification API. Refer to our API documentation for details.
App Interface
As a participant of the VRS testing exercise, you assume TWO roles within the CARO app. This means that you will see the interface designed for service providers (who you actually are) AND the interface designed for trading partners (who you pretend to be).
- Refer to our user guide for VRS for information on the interface for VRS.
- Refer to our user guide for trading partners for information on the interface for trading partners.
Further Resources
- CARO API Documentation
- OCI introductory resources including Getting Started with VRS Testing
VRS User Guide
CARO User Guide for VRS Providers
This document walks you through the functionalities of the CARO app, Spherity's Credentialing Service for Authorized Trading Partners (ATP), to enable you to navigate the user interface as a VRS provider. It does neither explain any technical details of the Credentialing Service nor provide guidelines for the technical implementation of CARO.
This document will be updated continuously. Please check back frequently, as new features and functionalities will be added to the application and explained here.
Development Status
The current application is a production version, which is continuously being developed further.
We would love to hear your feedback. Which functionalities or info screens are useful to you? What should we add or remove? How can we make your life easier? Please get in touch through one of the means detailed at the bottom of this page.
Getting Started
You must be invited to CARO before you can access the app's dedicated Service Provider space. The web app resides on app.caro.vc.
Once you have received an email invite, accept it by following the link in the email. On the CARO log-in screen you can check your details and set a password. After log-in, you will be forwarded to the CARO Dashboard.
You must be granted access by your VRS customers before you can facilitate VRS interactions on their behalf via our APIs.
System-wide Search
The search function applies across the CARO app. It groups results into applicable categories, such as reports, events, or credentials. You can access it by clicking on the magnifying glass icon 🔎 in the top right corner of the app screen or by using the keyboard shortcut CTRL+K.
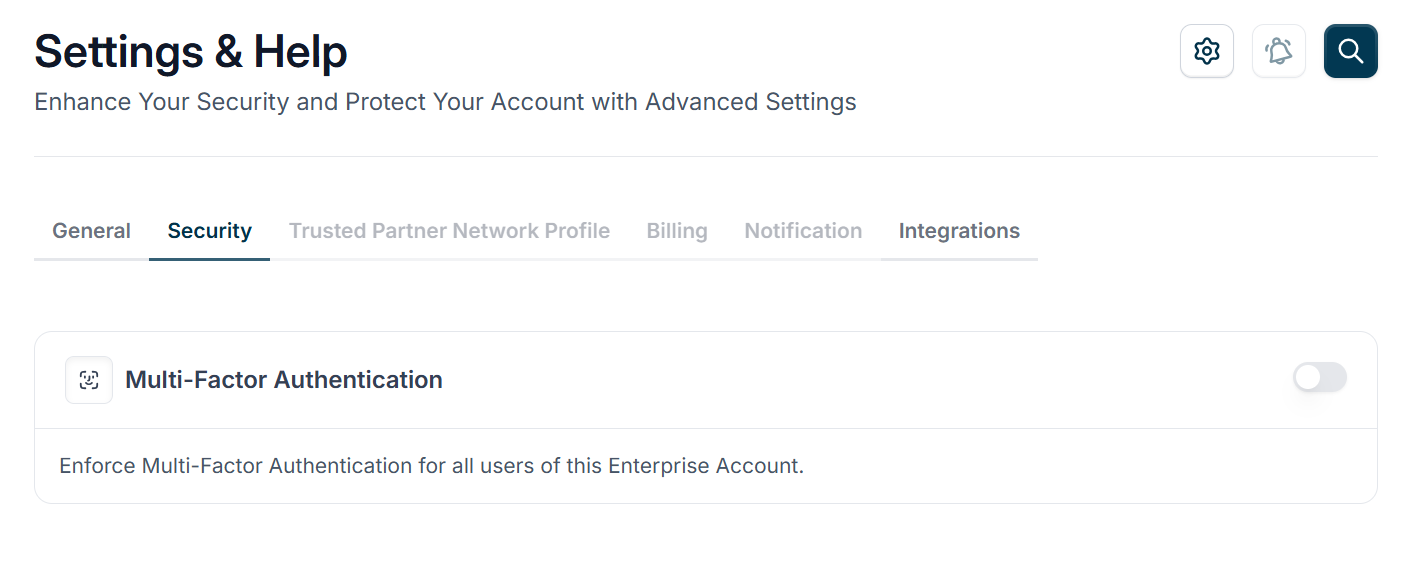
Clicking on the cogwheel icon ⚙️ in the top right corner of the app screen opens the global application settings. Here you can manage the security settings that apply across the entire Enterprise Account. You can check which service providers are integrated with your Enterprise Account. You can also find helpful links.
-- Enterprise Wallet --
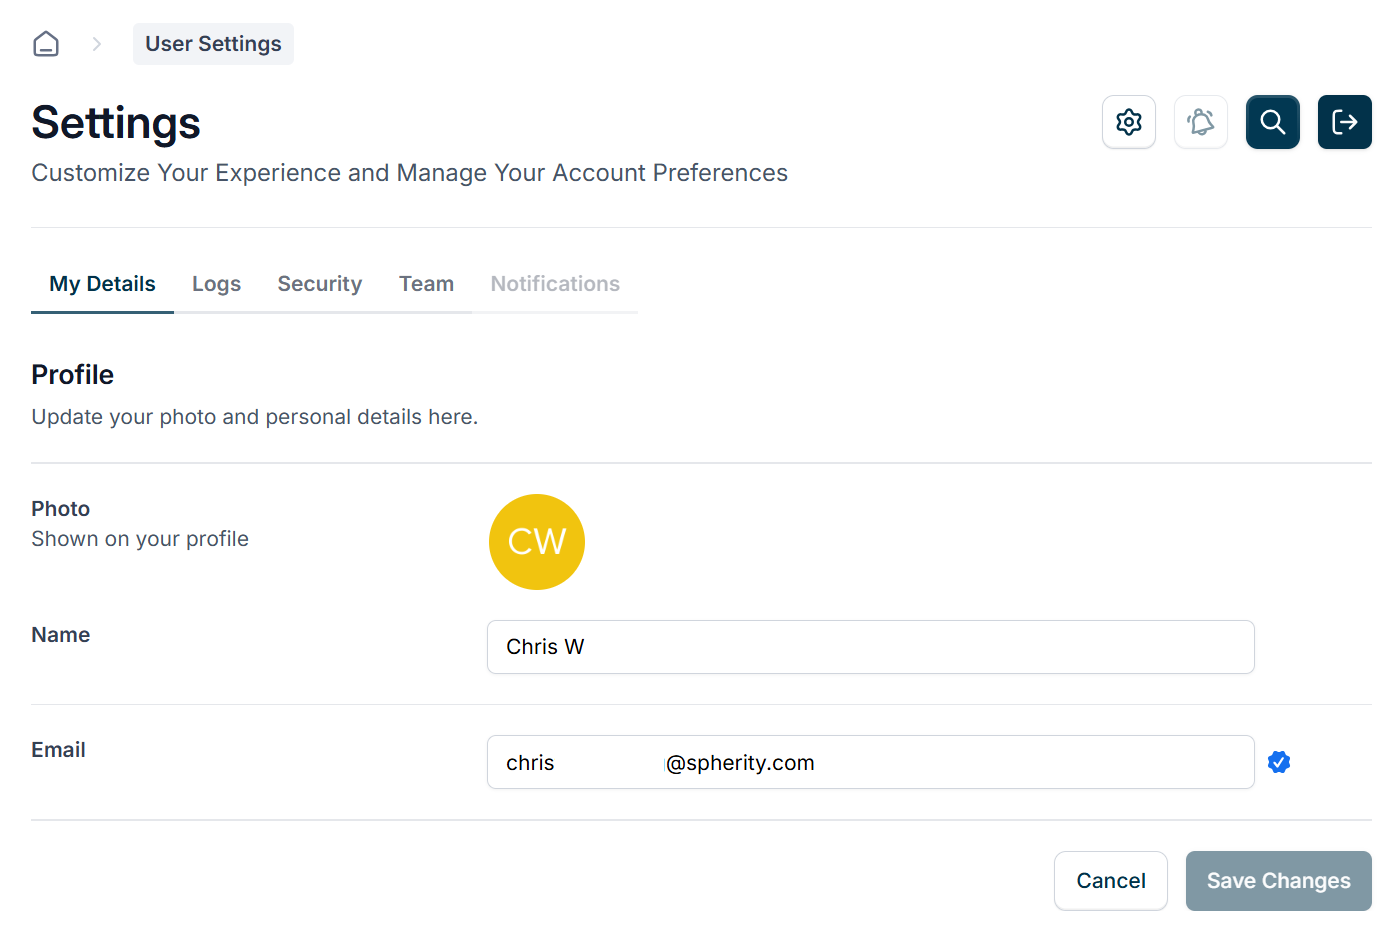
Profile
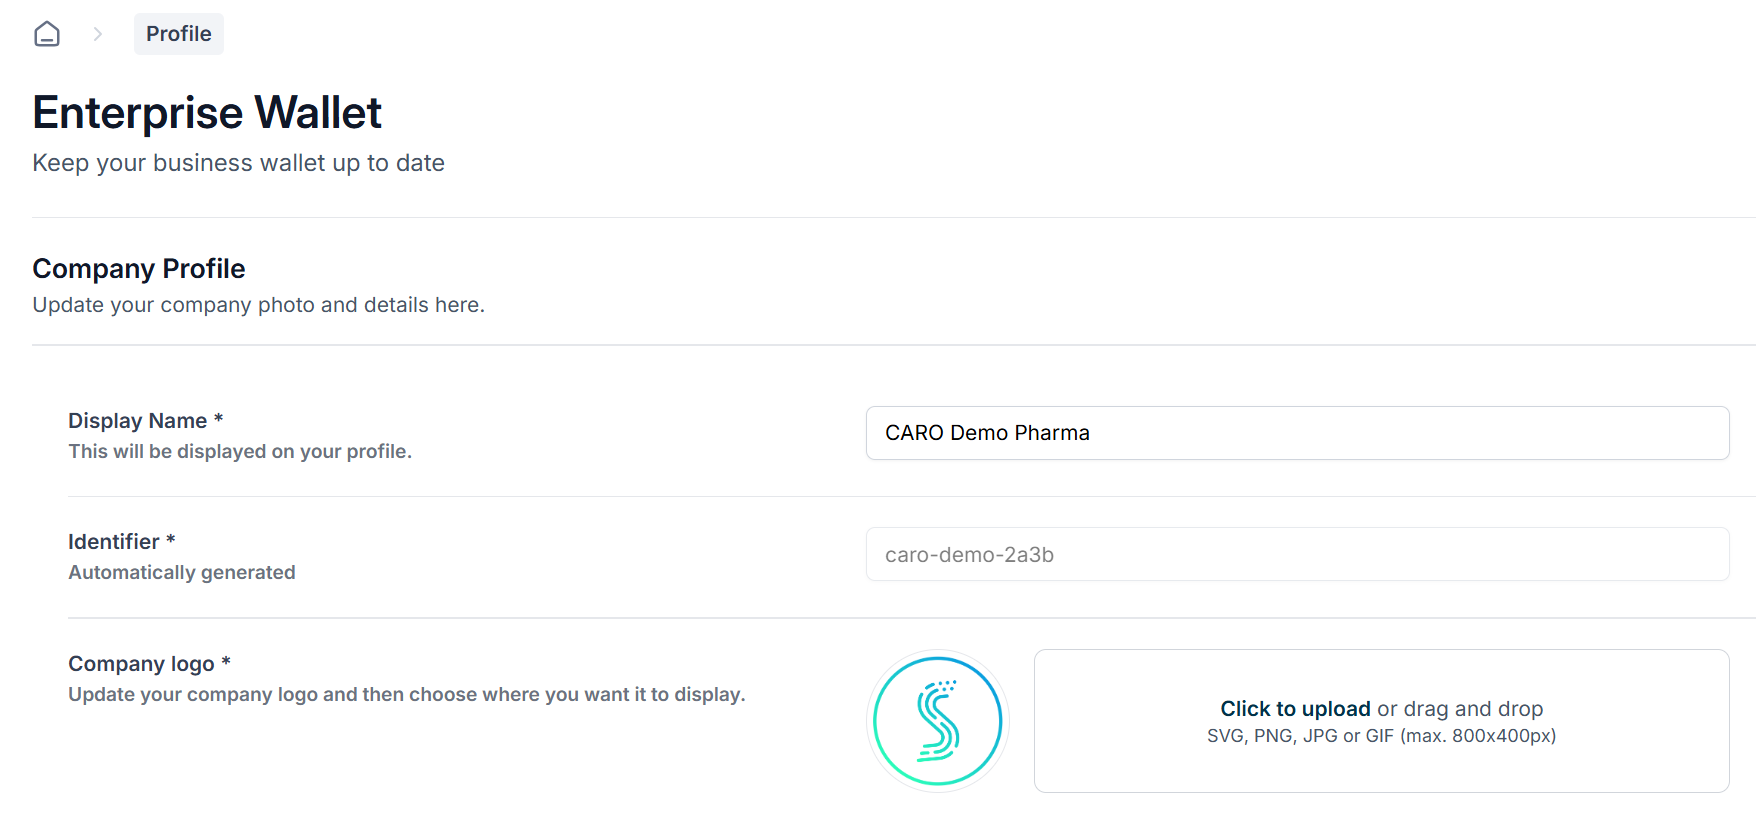 You can find your profile in the menu section Enterprise Wallet. Edit your profile as you want it to appear in the CARO network.
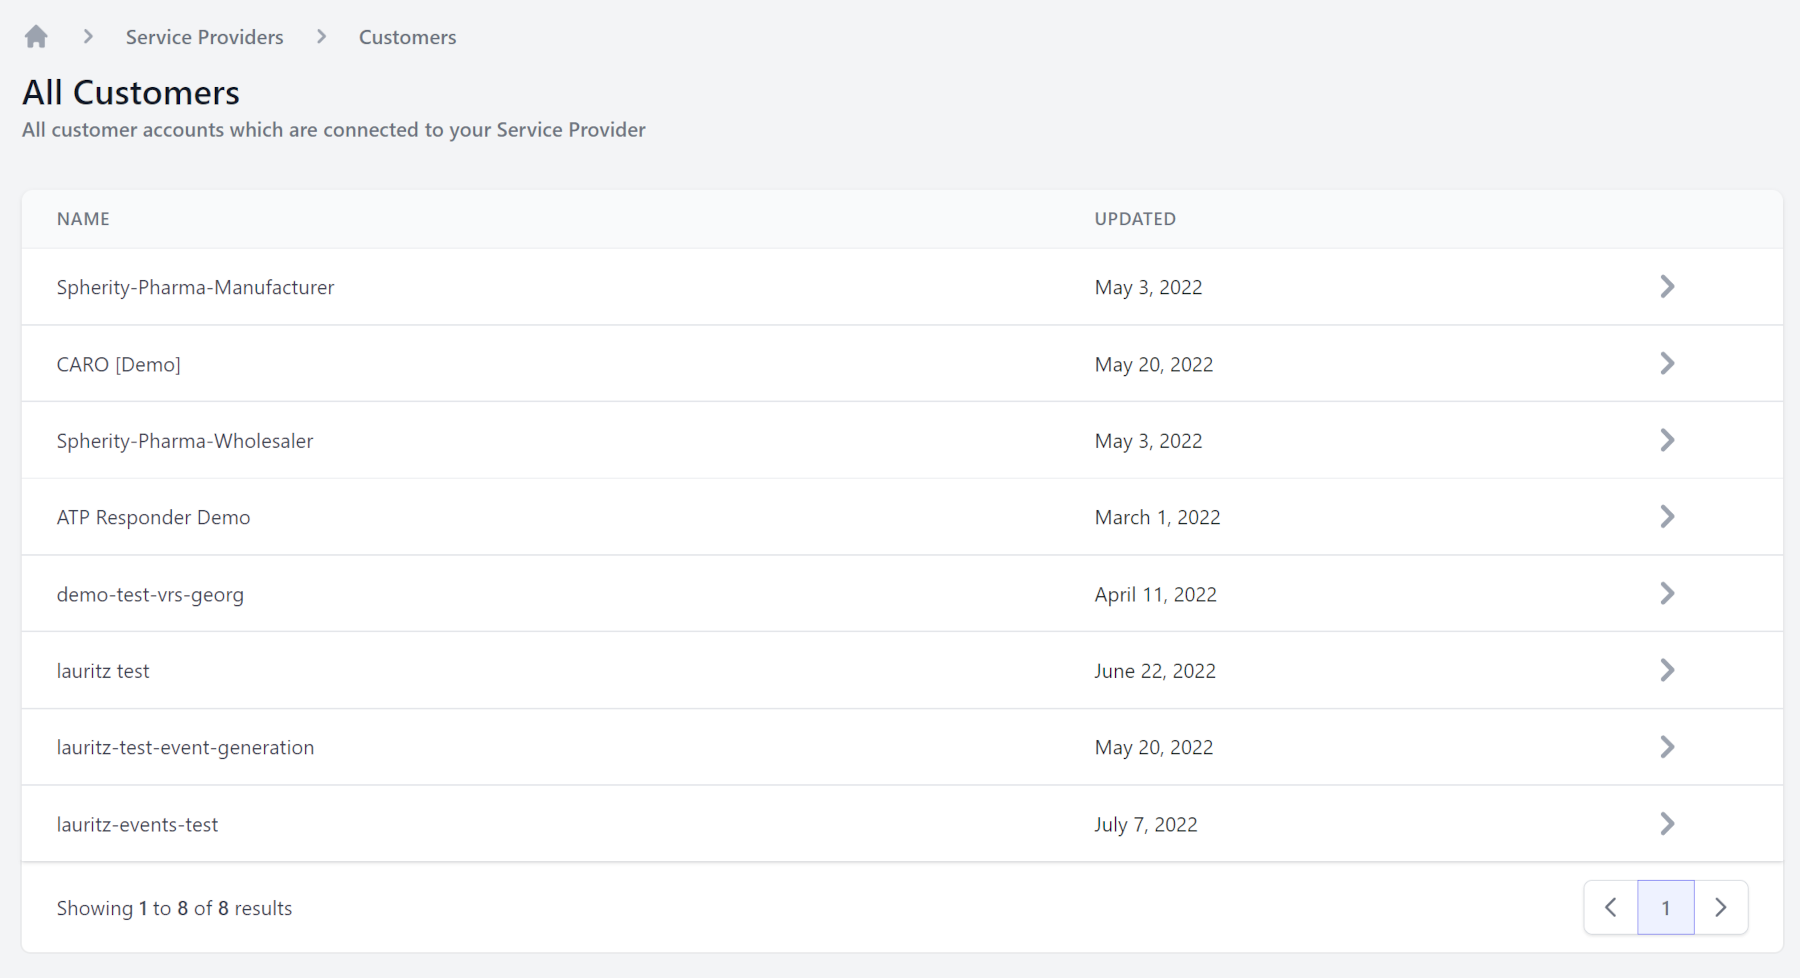
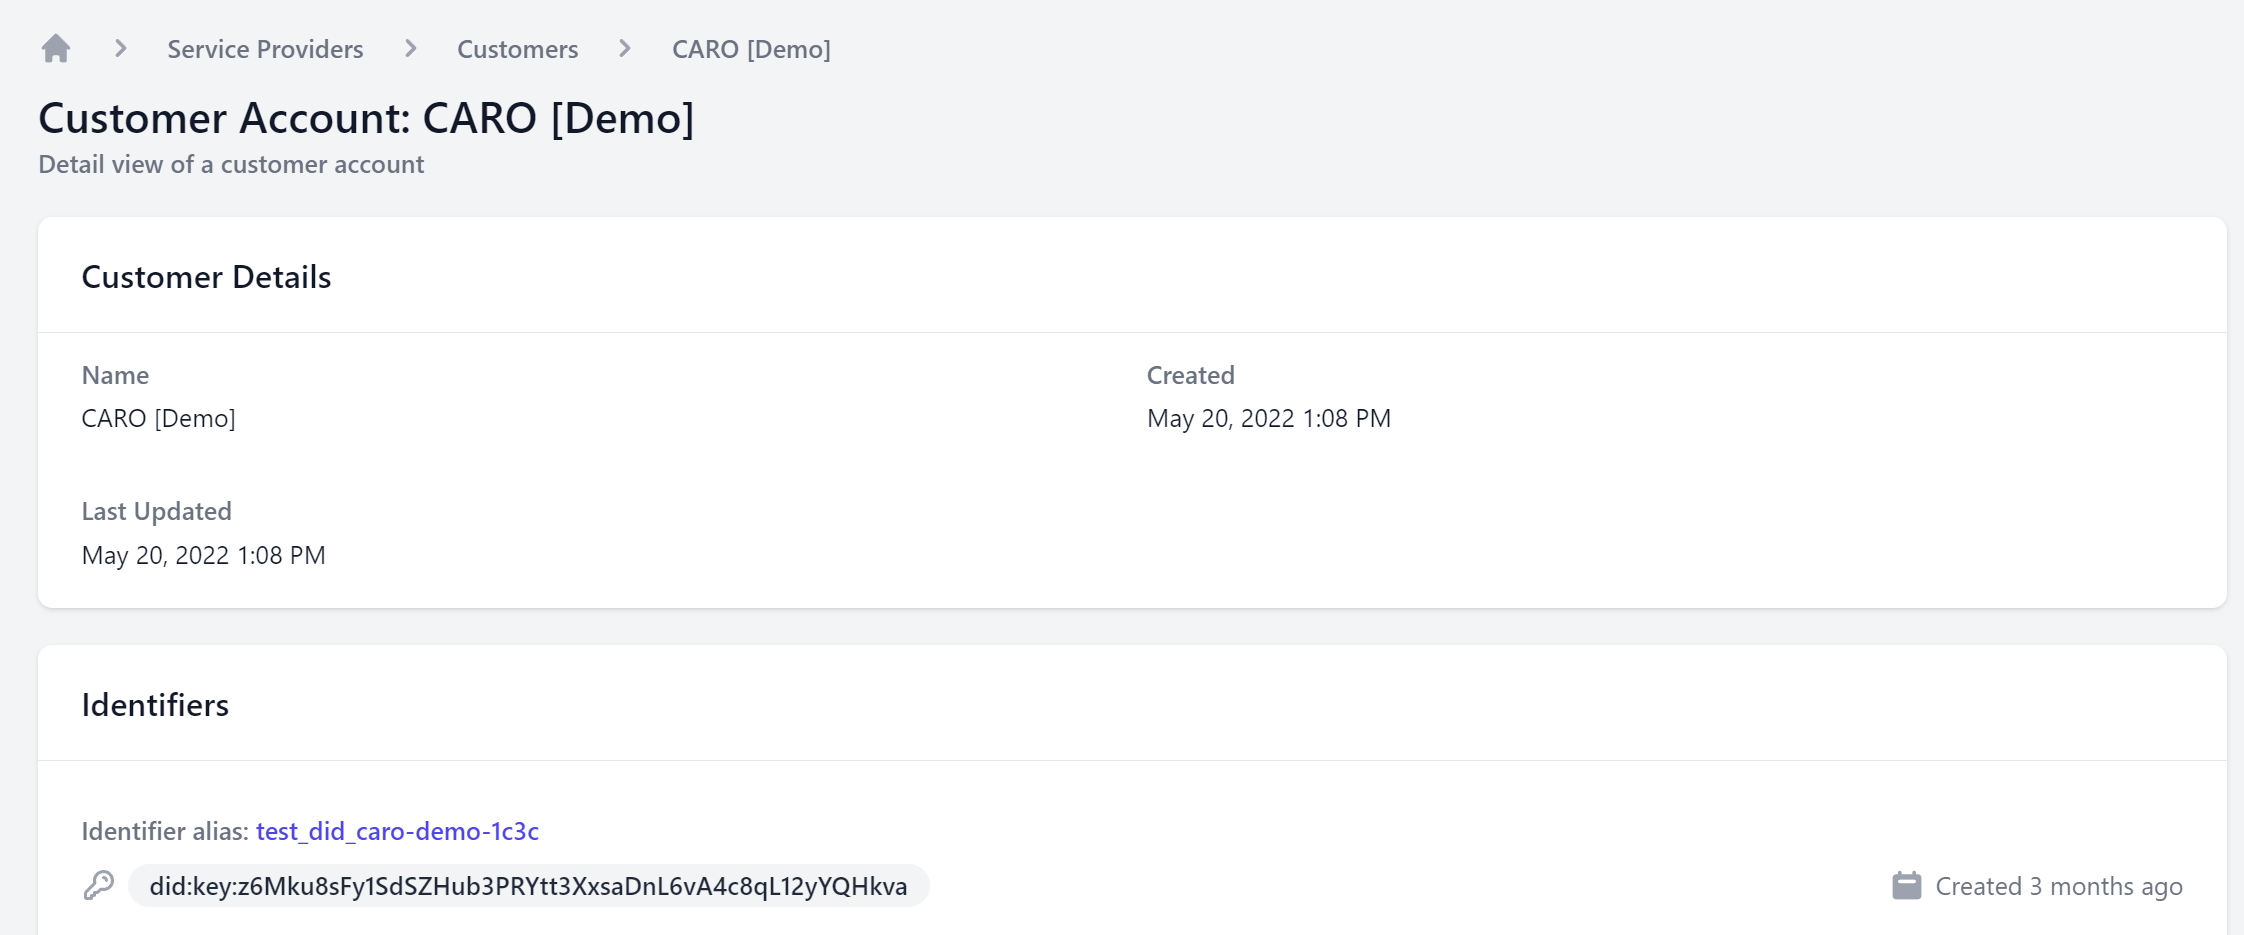
This screen shows a list of all customers who have granted you access to their account.
Customer Details
Clicking on any of the customers in the list will open a details view of this customer. Besides some basic information, it includes a list of their Enterprise Identifiers.
-- VRS Interactions --
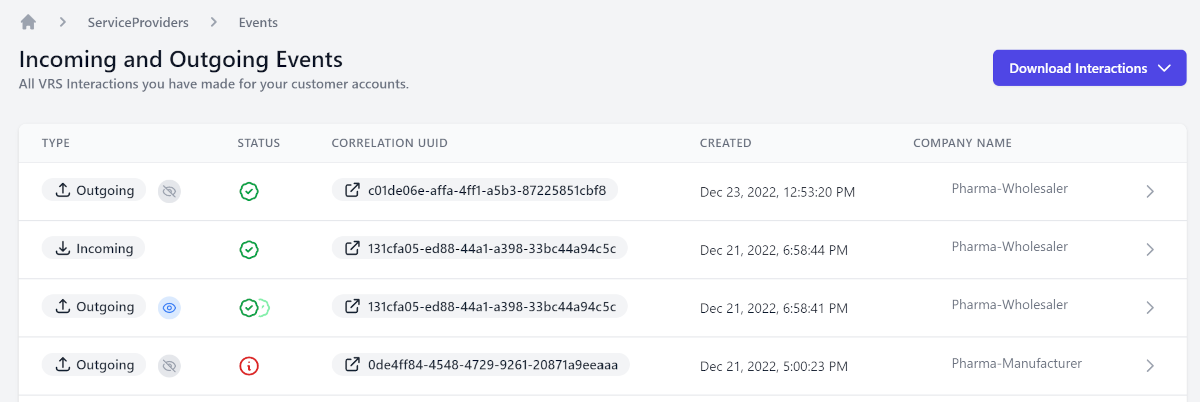
This screen shows a list of all VRS transactions executed under the same client ID, i.e. your Service Provider account. Each generation or verification event associated with any of your customers is listed here.
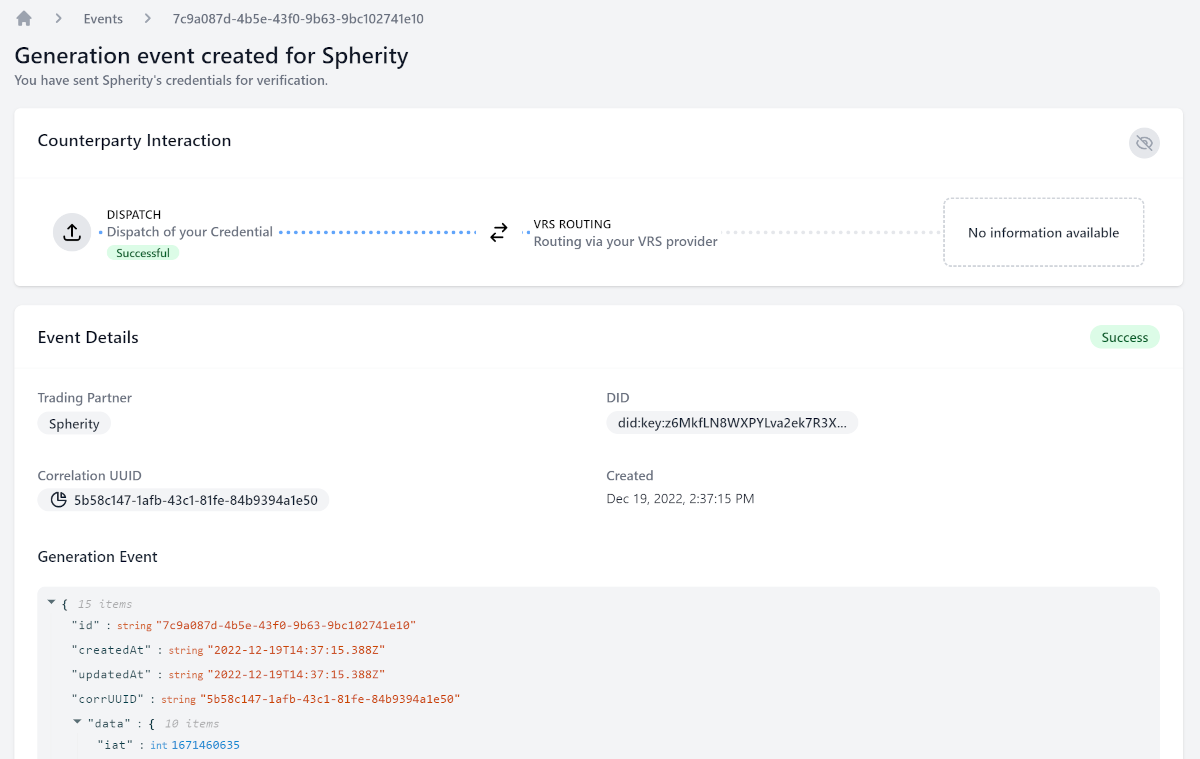
Event Details
Clicking on any of the events in the list will open a details view of this transaction. Besides some basic information, this page provides you with a developer view of the sent or received event. For Outgoing Events (Generations), you will also see a section called Counterparty Interaction. The counterparty is the trading partner at the other end of the selected VRS-facilitated exchange and may or may not be another one of your customers. Read more in the Trading Partner User Guide.
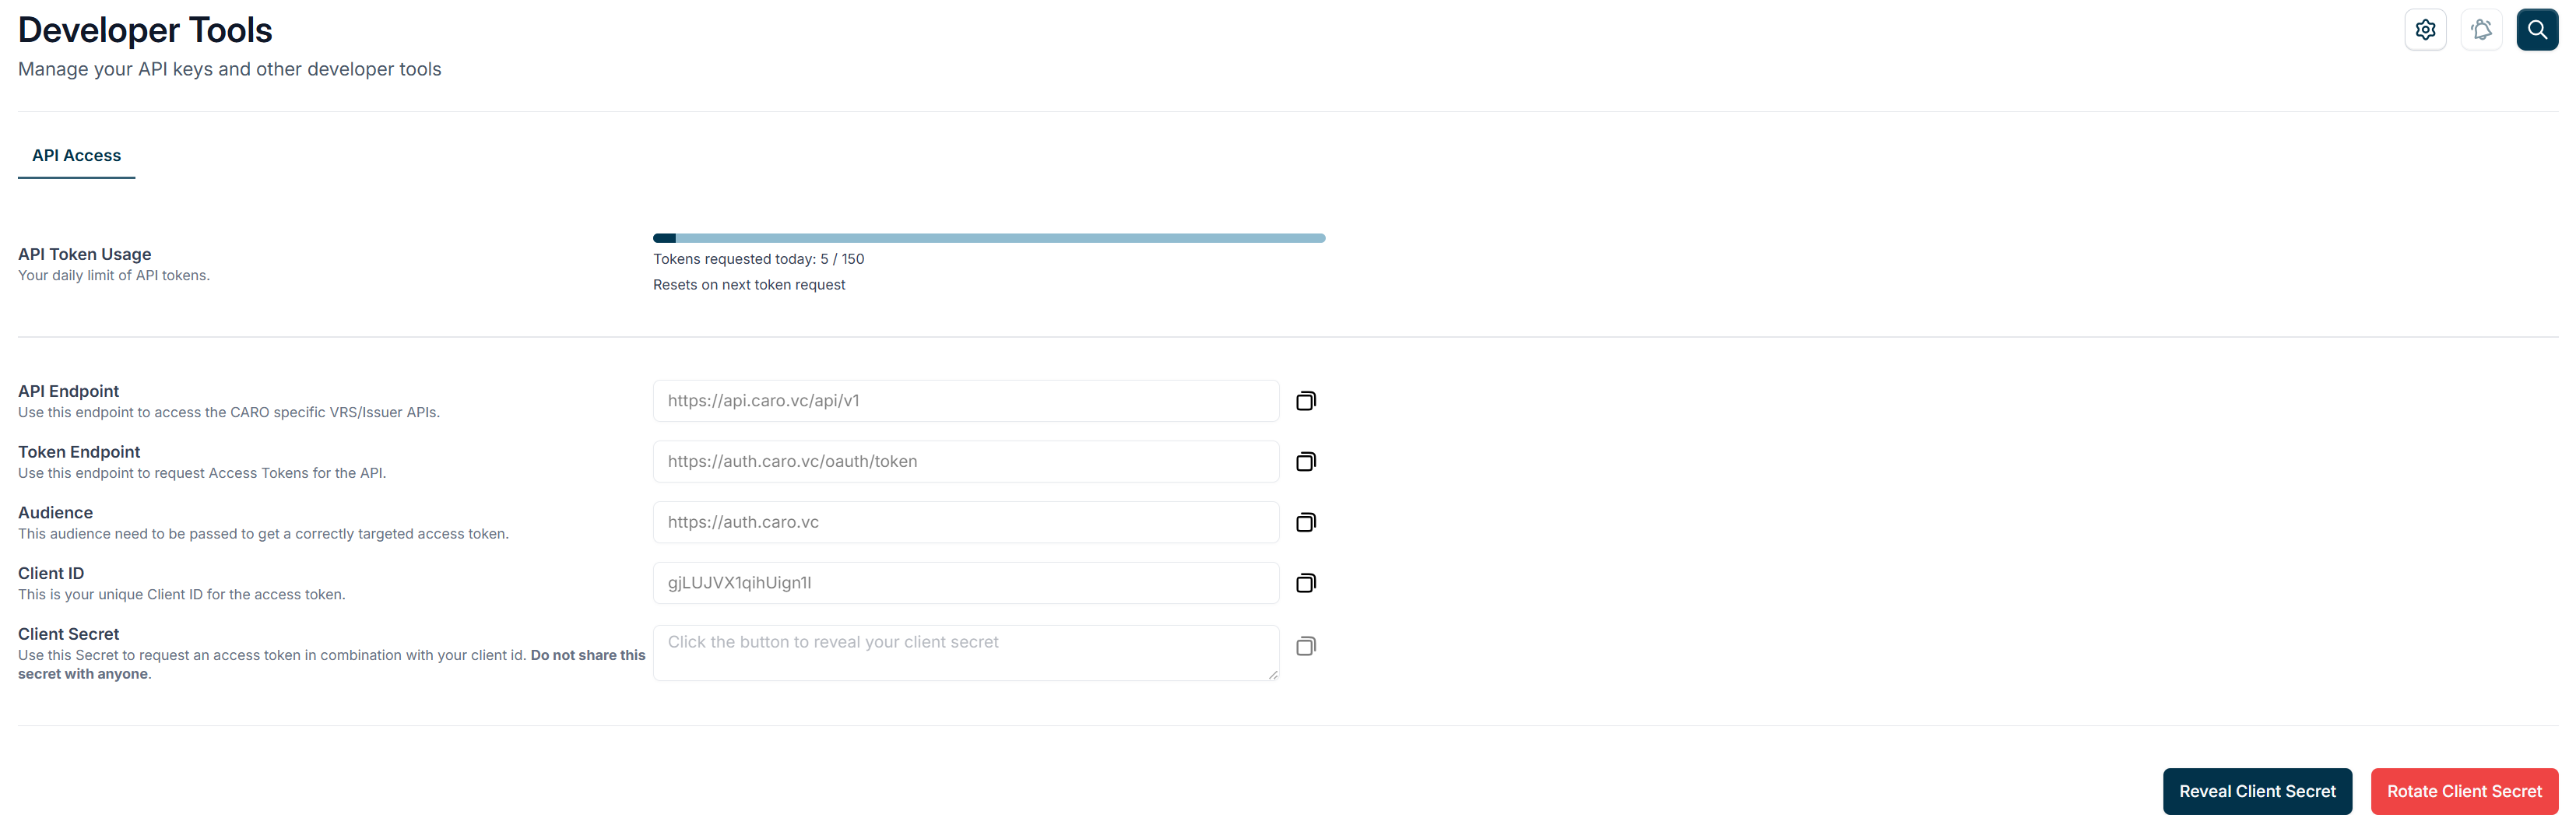 Here you can see your API token usage, manage your API client keys, including key rotation, and access other developer tools.
Clicking on the tile with your name in the bottom left corner of the app screen opens the User Settings.
Here you can manage your profile, your own security settings, and inspect account activity logs.
In addition, all CARO Accounts to which you have been granted user access are listed here. You can move between accounts by clicking on the Switch button for each. You can also quit any account.
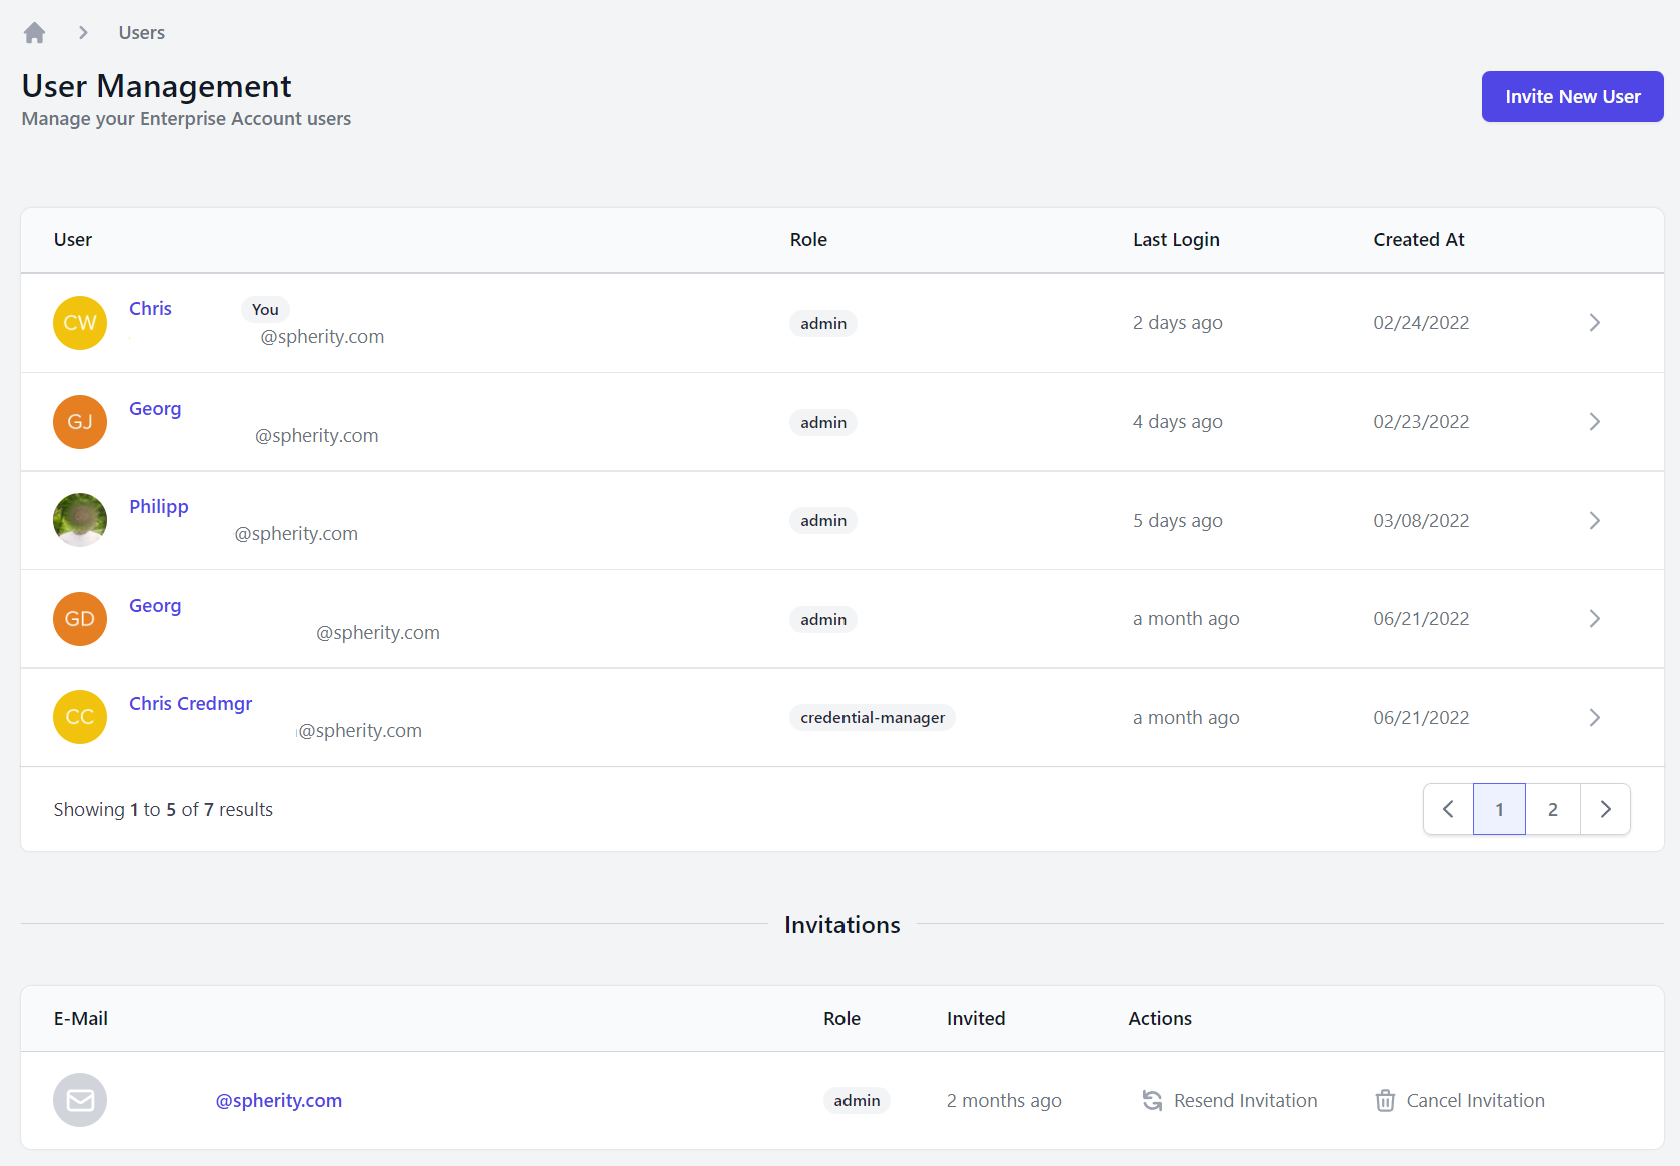
This screen shows all users who have access or have been invited to the Enterprise Account. You can remove existing users by clicking on the bin icon 🗑 or change their role by clicking on the pencil icon ✎.
Adding New Users
After clicking Send Invite in the top right corner, a small form will prompt you to enter the new user's email address and select their user role. Once you have confirmed the invitation, the new user will receive an email inviting them to set up their account access.
Available User Roles
Service Provider Manager
- Administration of Service Provider space
- User and role management
Service Provider Developer
- as Service Provider Manager + access to client ID and secret for authentication
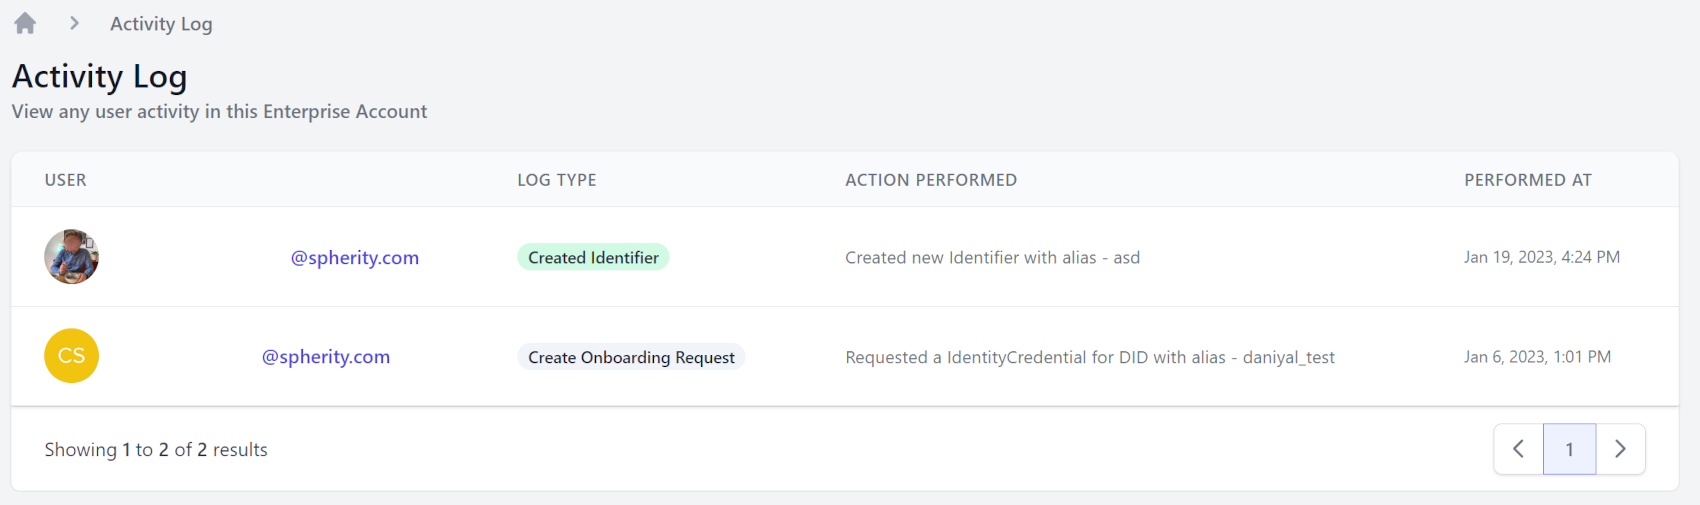
This screen lists the actions account users have performed in your CARO Account.
Further Resources
Trading Partner User Guide
CARO User Guide for Trading Partners
This document walks you through the functionalities of the CARO app, Spherity's Credentialing Service for Authorized Trading Partners (ATP), to enable you to navigate the user interface. It does neither explain any technical details of the Credentialing Service nor provide guidelines for the technical implementation of CARO.
This document will be updated continuously. Please check back frequently, as new features and functionalities will be added to the application and explained here.
If you are looking for a high-level overview of CARO, visit our website. You may also want to peruse some essential concepts about our app.
Development Status
The current application is a production version, which is continuously being developed further.
We would love to hear your feedback. Which functionalities or info screens are useful to you? What should we add or remove? How can we make your life easier? Please get in touch through one of the means detailed at the bottom of this page.
Getting StartedAn important step for getting properly set up with CARO is to onboard your organization. This involves checking a few documents that prove your organization's details and ATP status. Get a quick overview of the information needed to register your organization in our short onboarding guide.
You must be invited to CARO before you can access it. The web app resides on app.caro.vc.
Once you have received an email invite, accept it by following the link in the email. On the CARO log-in screen you can check your details and set a password. After log-in, you will be forwarded to the CARO Dashboard.
If you are unsure, you may want to watch our short video that walks you through the onboarding process.
Watch onboarding video-- Dashboard --
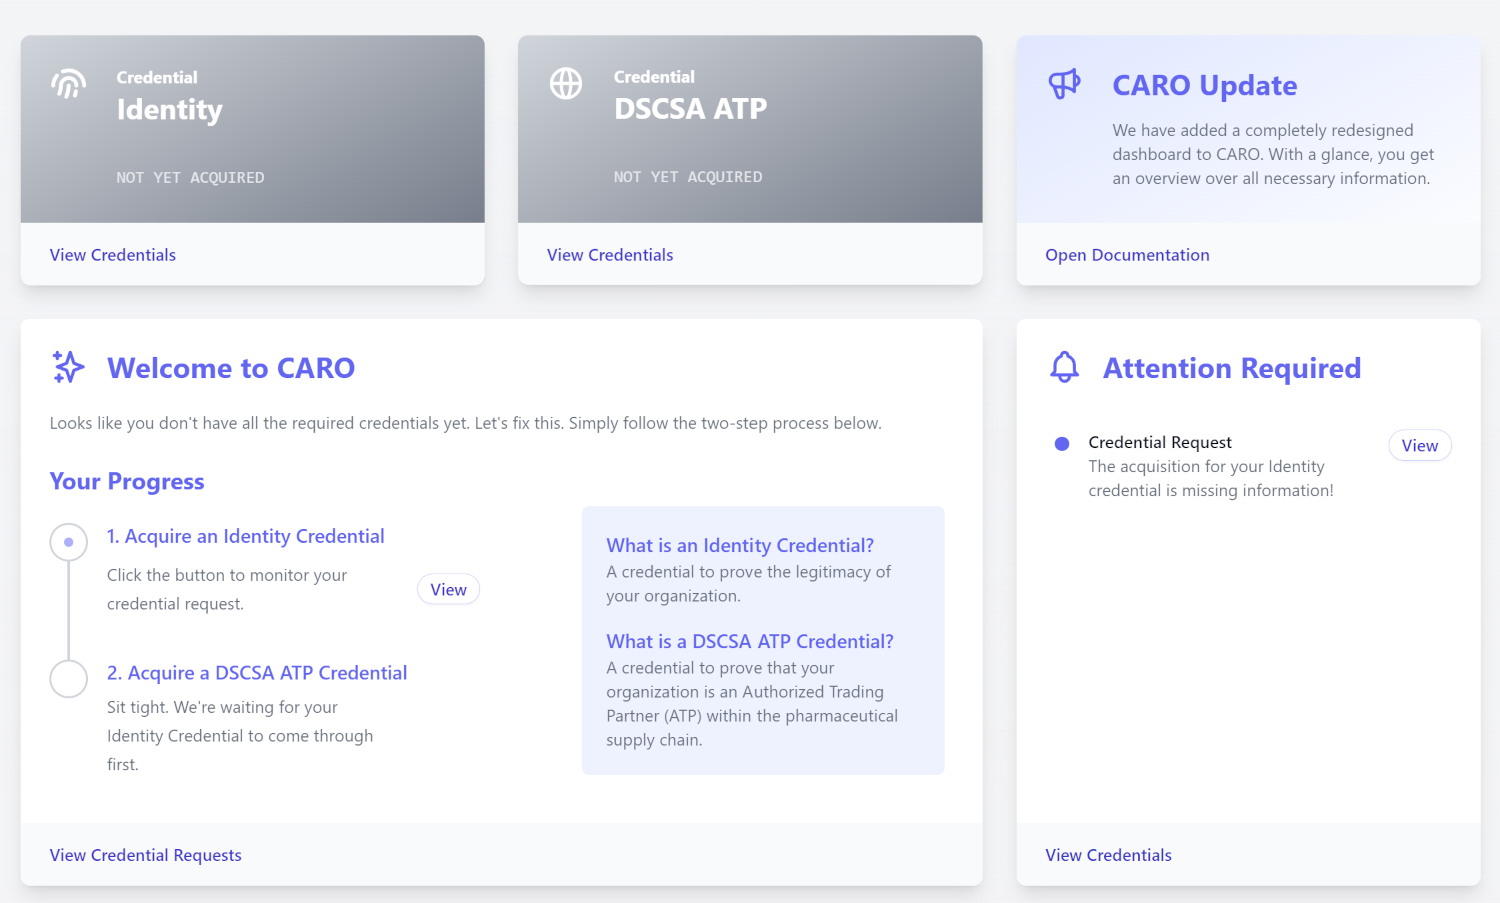
The dashboard provides some useful information about your account activity.
New to CARO?For as long as you are setting up your new CARO Enterprise Account, the dashboard will show you a Getting started section. Simply follow the in-app steps to get set up with your first two essential credentials.
System-wide Search
The search function applies across the CARO app. It groups results into applicable categories, such as reports, events, or credentials. You can access it by clicking on the magnifying glass icon 🔎 in the top right corner of the app screen or by using the keyboard shortcut CTRL+K.
Clicking on the cogwheel icon ⚙️ in the top right corner of the app screen opens the global application settings. Here you can manage the security settings that apply across the entire Enterprise Account. You can check which service providers are integrated with your Enterprise Account. You can also find helpful links.
-- VRS Interactions --
VRS EventsThe term VRS Events within CARO refers only to the credential processing between CARO and your VRS, not the entire VRS messaging roundtrip.
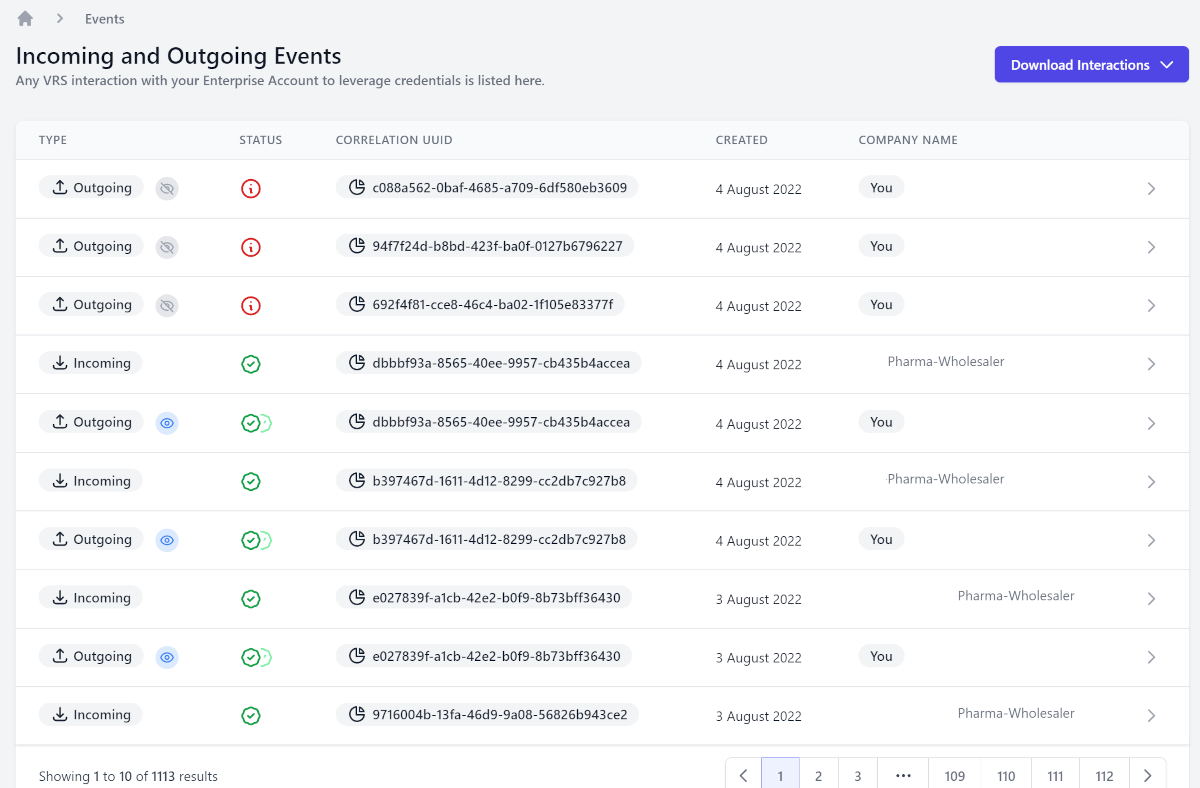
You can find your VRS Events in the menu section VRS Interactions. This screen shows a list of all VRS interactions with your Enterprise Account once they have taken place. You can filter your view and download transaction listings. The screen provides the status of incoming and outgoing VRS Events. Read more in section VRS Event Status below.
Before any interaction can happen, your VRS provider must have been granted restricted access to your Enterprise Account. This is either done by Spherity or your VRS provider in agreement with you.
VRS Event DetailsClicking on any of the interactions in the VRS Events list will open a details view of this event.
Example: Outgoing VRS Event
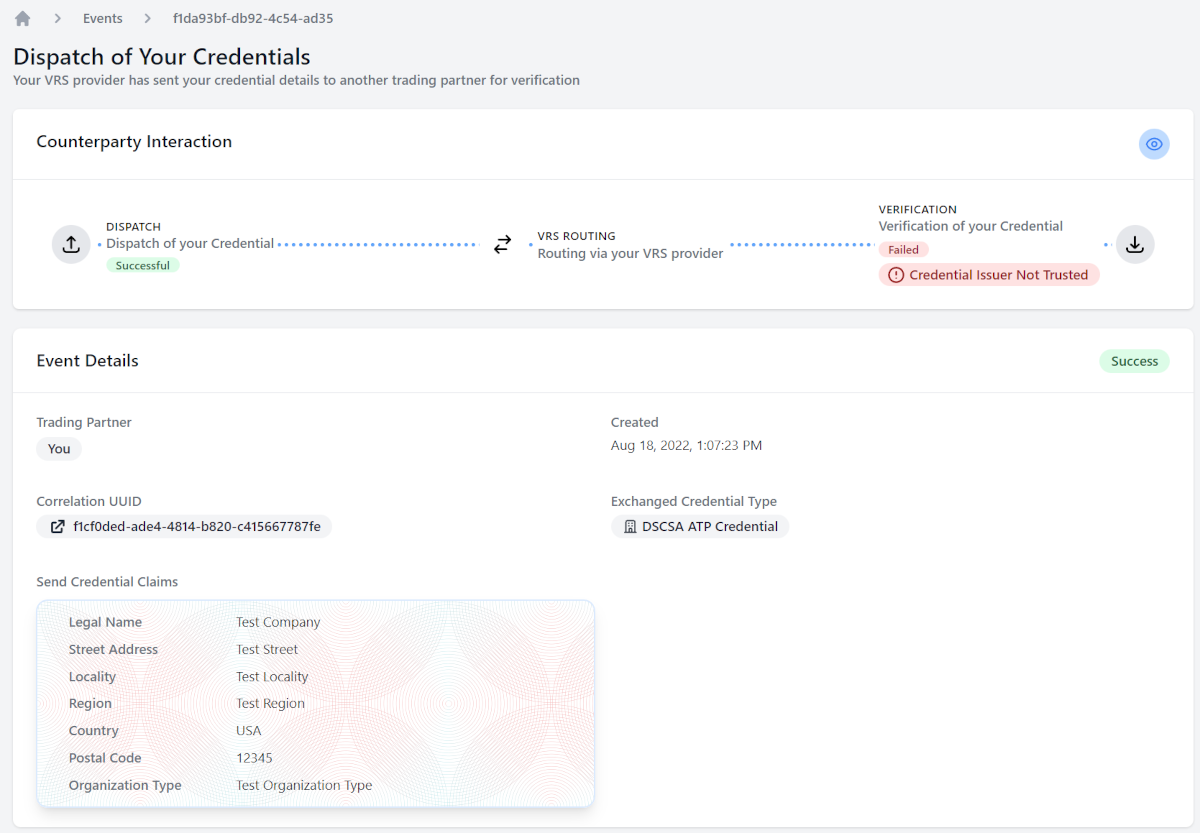
For Outgoing VRS Events only, you will see a section called Counterparty Interaction. The counterparty is the trading partner you have interacted with in the selected VRS-facilitated exchange. Read more in section VRS Event Status below.
VRS Event StatusIn the VRS Events overview screen, CARO displays the VRS Event status for incoming and outgoing events. This tells you about the outcome of the VRS-facilitated credential exchange with the other trading partner, i.e. your counterparty.
On drilling into VRS Event Details of an outgoing event, you will see a section called Counterparty Interaction. This section portrays the flow of your credential details from your CARO Enterprise Account through your VRS to the other trading partner. It tells you what has happened to your VRS-facilitated credential exchange at your counterparty's end of the interaction. This status is only available when your counterparty is also a CARO user. Furthermore, it is possible that your VRS system finds that something is wrong with your credential and may choose not to send it over to your business partner. Hence, there would be no counterparty status.
If the counterparty status is available, it will show the result. If the counterparty status is not available, the following flow is displayed.

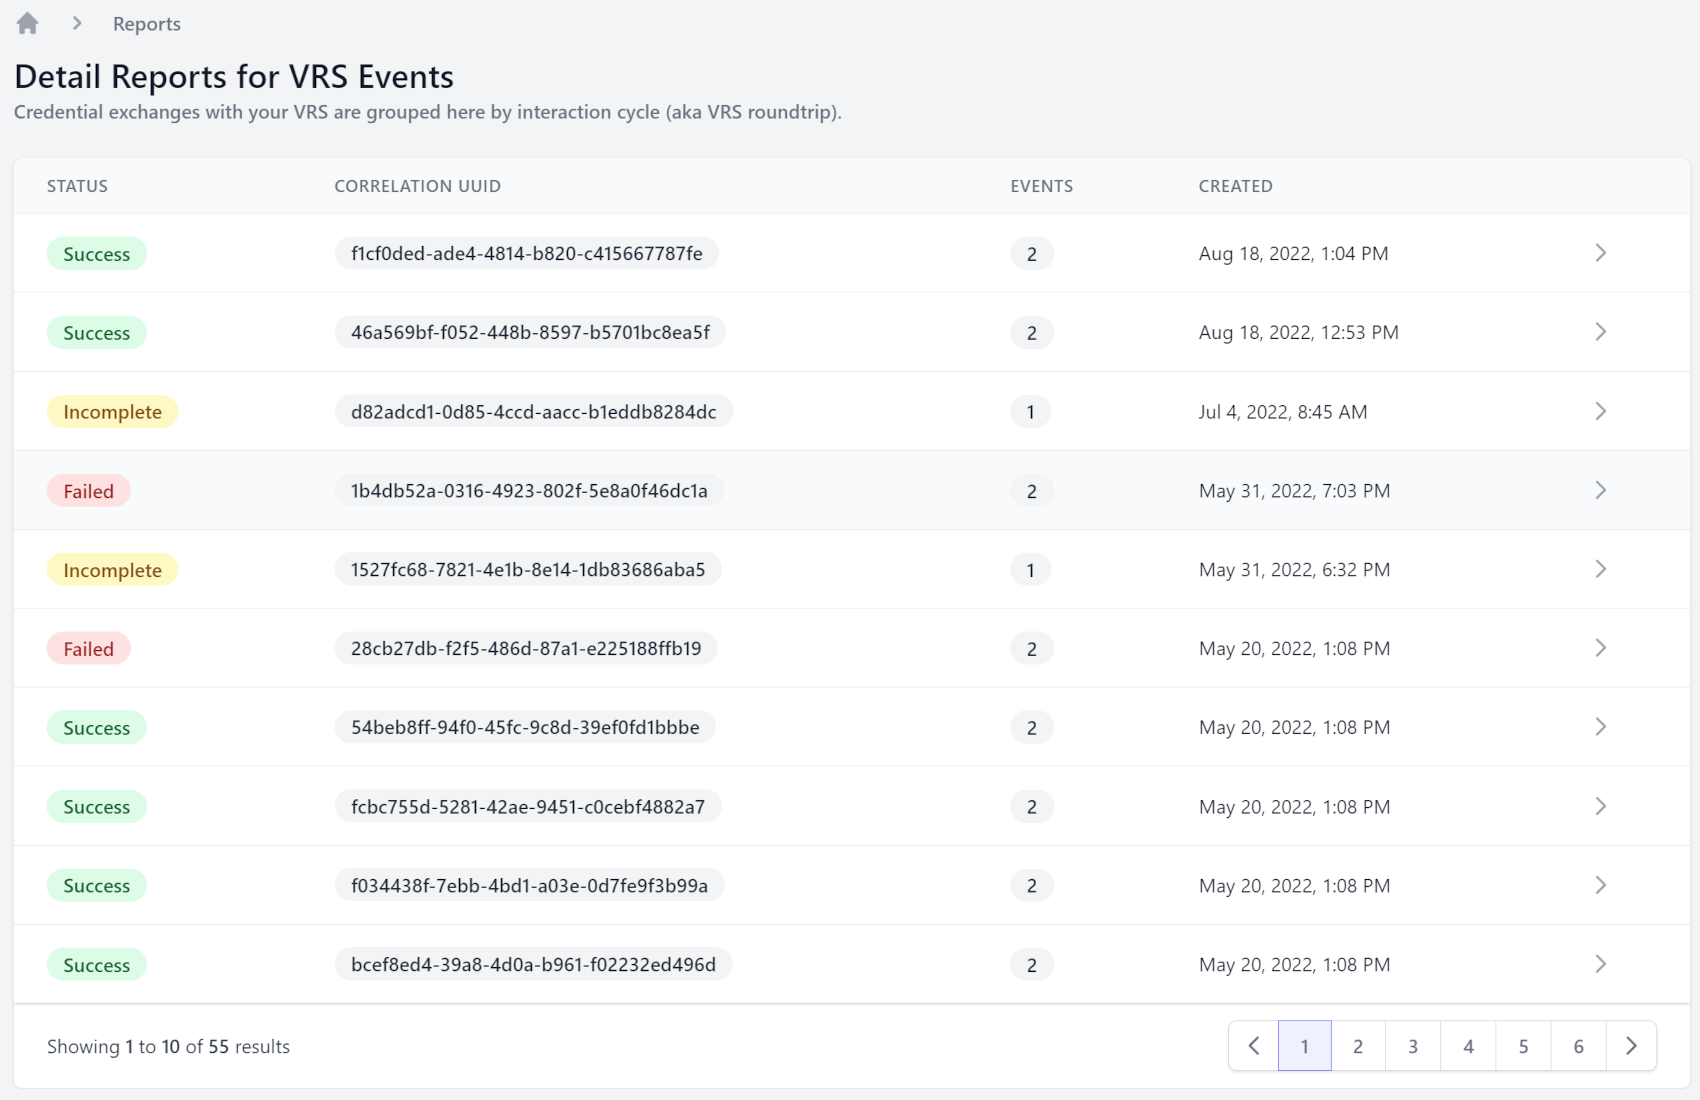
You can find your VRS Reports in the menu section VRS Interactions. This screen shows a list of all VRS messaging roundtrips, i.e. the outgoing and incoming VRS Events belonging to the same unique interaction identifier (Correlation UUID). The same identifier is also used by your VRS provider and, thus, represents a shared reference for audits and inquiries across systems.
Read more about VRS ReportsVRS Report Details
Clicking on any of the VRS roundtrips in the VRS Reports list will open a details view of this roundtrip. This tells you what exactly happened in the entire interaction trail between your Enterprise Account and your counterparty.
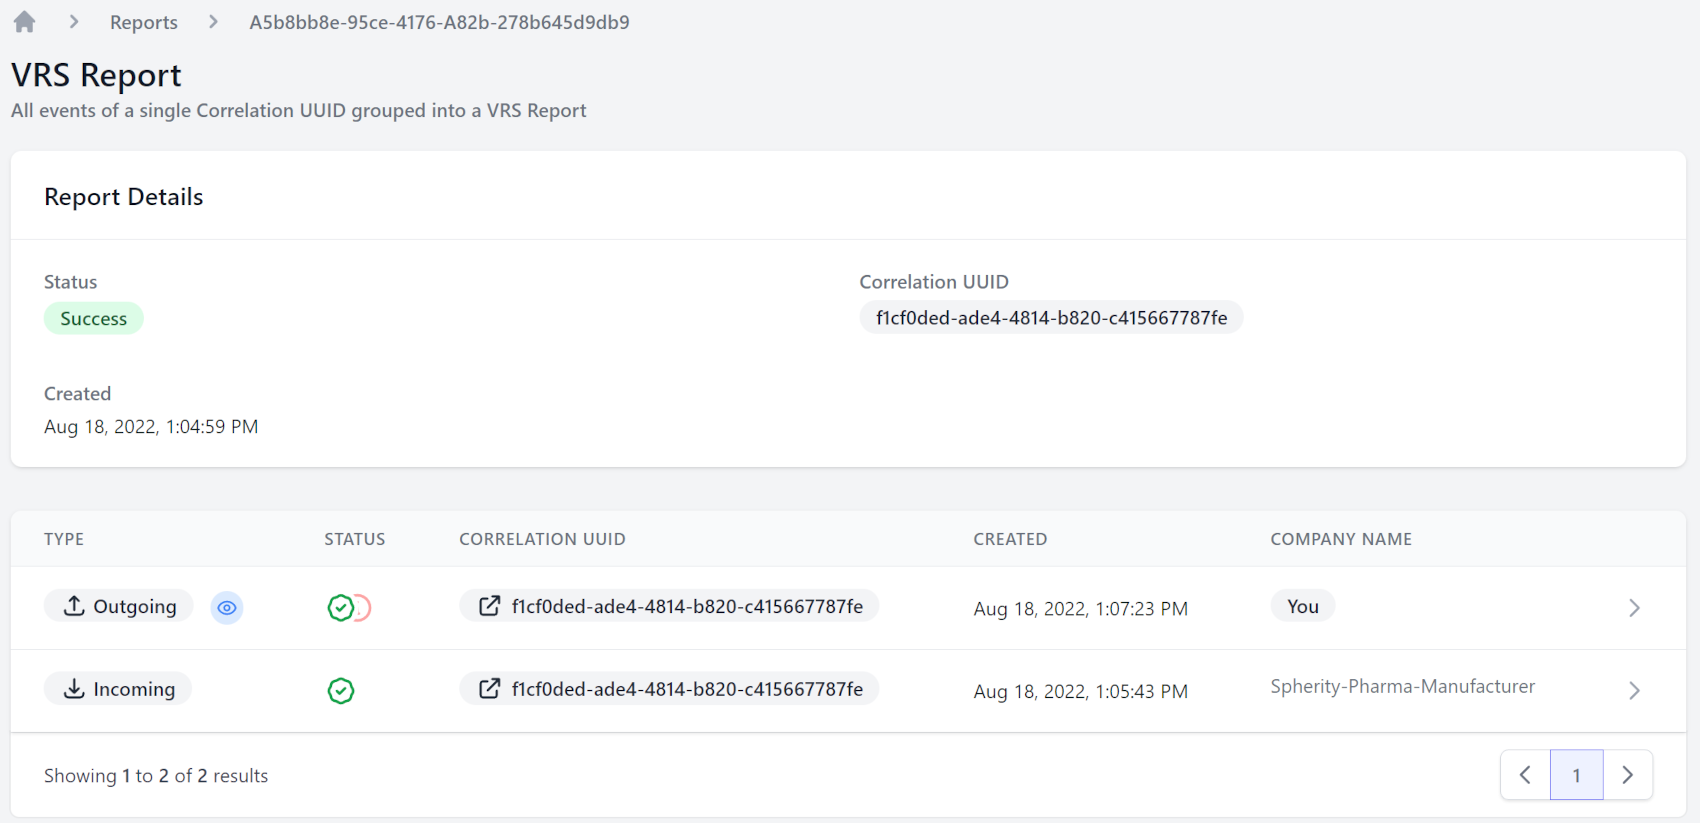
Clicking on any of the interactions in the list will redirect you to the VRS Event details view of this event.
-- Enterprise Wallet --
Profile
You can find your profile in the menu section Enterprise Wallet. Edit your profile as you want it to appear in the CARO network.
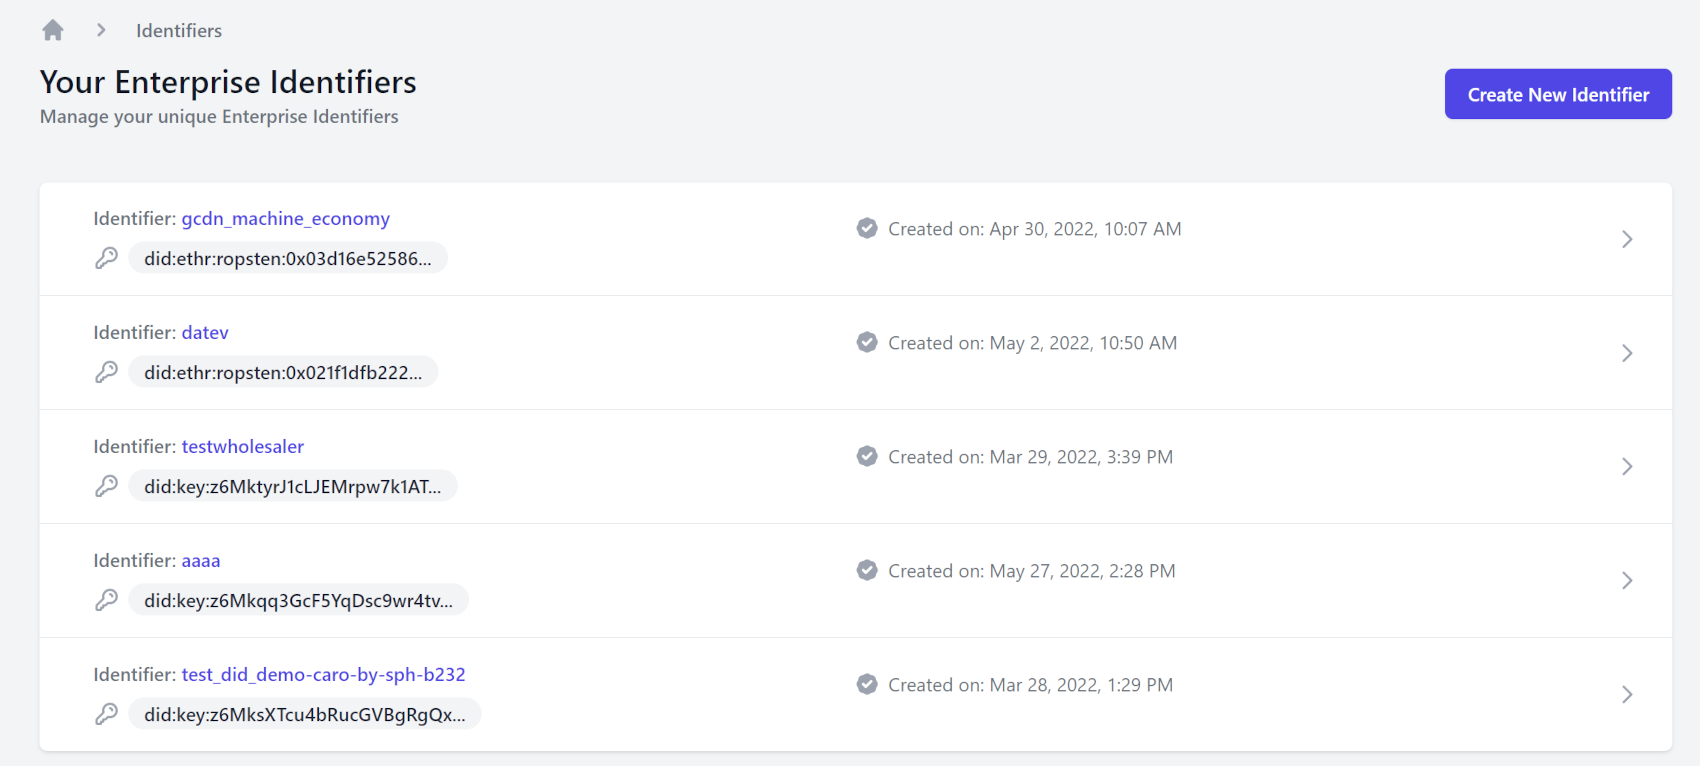
You can find your Enterprise Identifiers in the menu section Enterprise Wallet. This screen shows your Enterprise Account's decentralized identifiers (DIDs). Each Enterprise Account must have at least one such Enterprise Identifier because having a unique DID assigned to your enterprise is a prerequisite for credential acquisition. Each enterprise that requires its own set of credentials must have its own DID. This DID is persistent. This means it will never change within the system so that it continuously identifies the particular enterprise to which it had been assigned originally.
Read more about identifiers Adding New Enterprise IdentifiersGenerally, CARO automatically creates your first DID as part of the initial onboarding process.
Should you require more DIDs, say for additional business locations that hold their own credentials, you will need to create a new unique DID per additional enterprise.
It is important to note that any VRS events linked to any of the DIDs in the same Enterprise Account will be visible to all users with the respective user-level permissions within this Enterprise Account. If you wanted to keep the interaction records of particular enterprises separate, you would need to create a new separate Enterprise Account instead. Please contact us to explore which option is most suitable for your situation if you are unsure.
After clicking New Identifier on the main screen, you will be prompted to give your new DID a meaningful name and select a method to create this identifier, a so-called DID method.
If all you want is to create a DID for a real enterprise, simply select one of the first two options (did:ethr with/without HSM). HSM means 'Hardware Security Module'. CARO uses a cloud-based version, which provides enhanced security by preventing extraction of your private keys. You can have no more than 1 HSM-backed DID in your CARO Enterprise Account.
If you are interested in experimenting with CARO, select any of the DID methods in tab Testing Identifiers. Please contact us if you want us to join your experiment or to discuss your needs.

Once you have confirmed your choice, you will see your newly created DID listed.
On joining CARO you will undergo a process called credentialing during which your organizations's legal and regulatory status within the US pharmaceutical supply chain is checked. The result of this process are the digital Verifiable Credentials you hold within CARO.
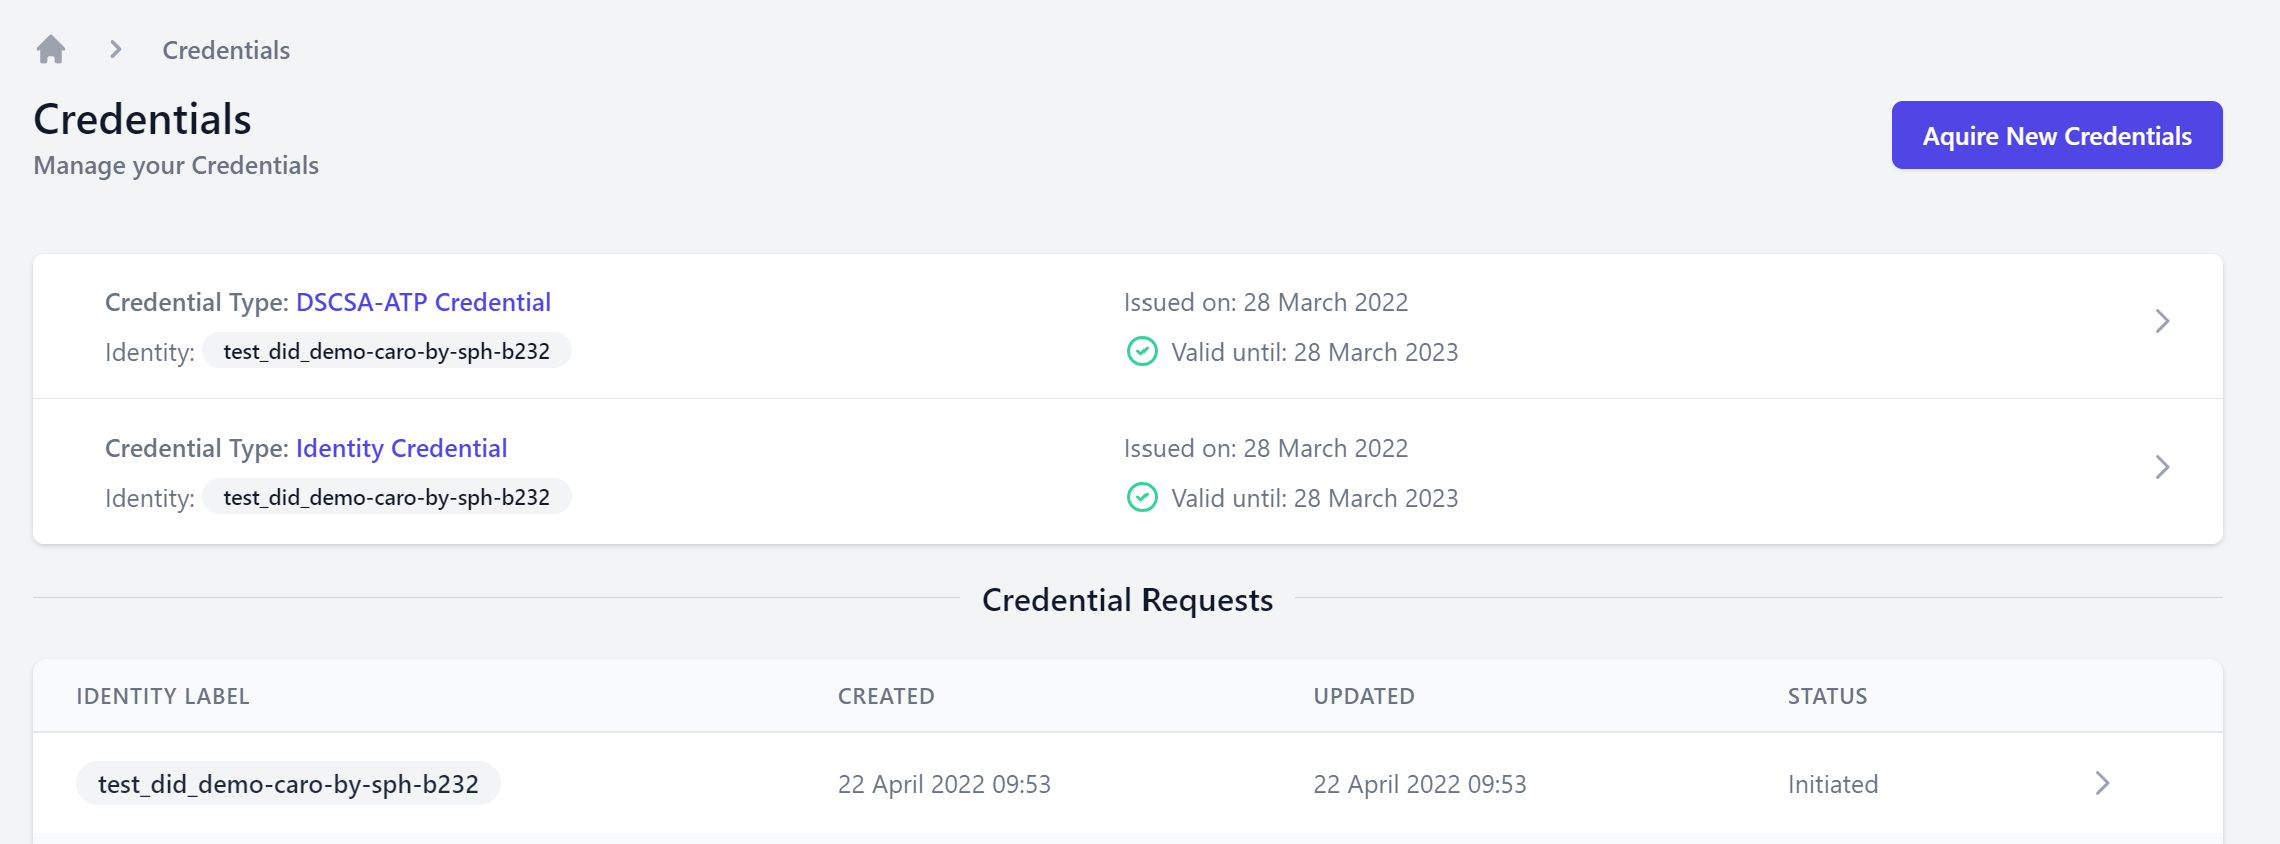
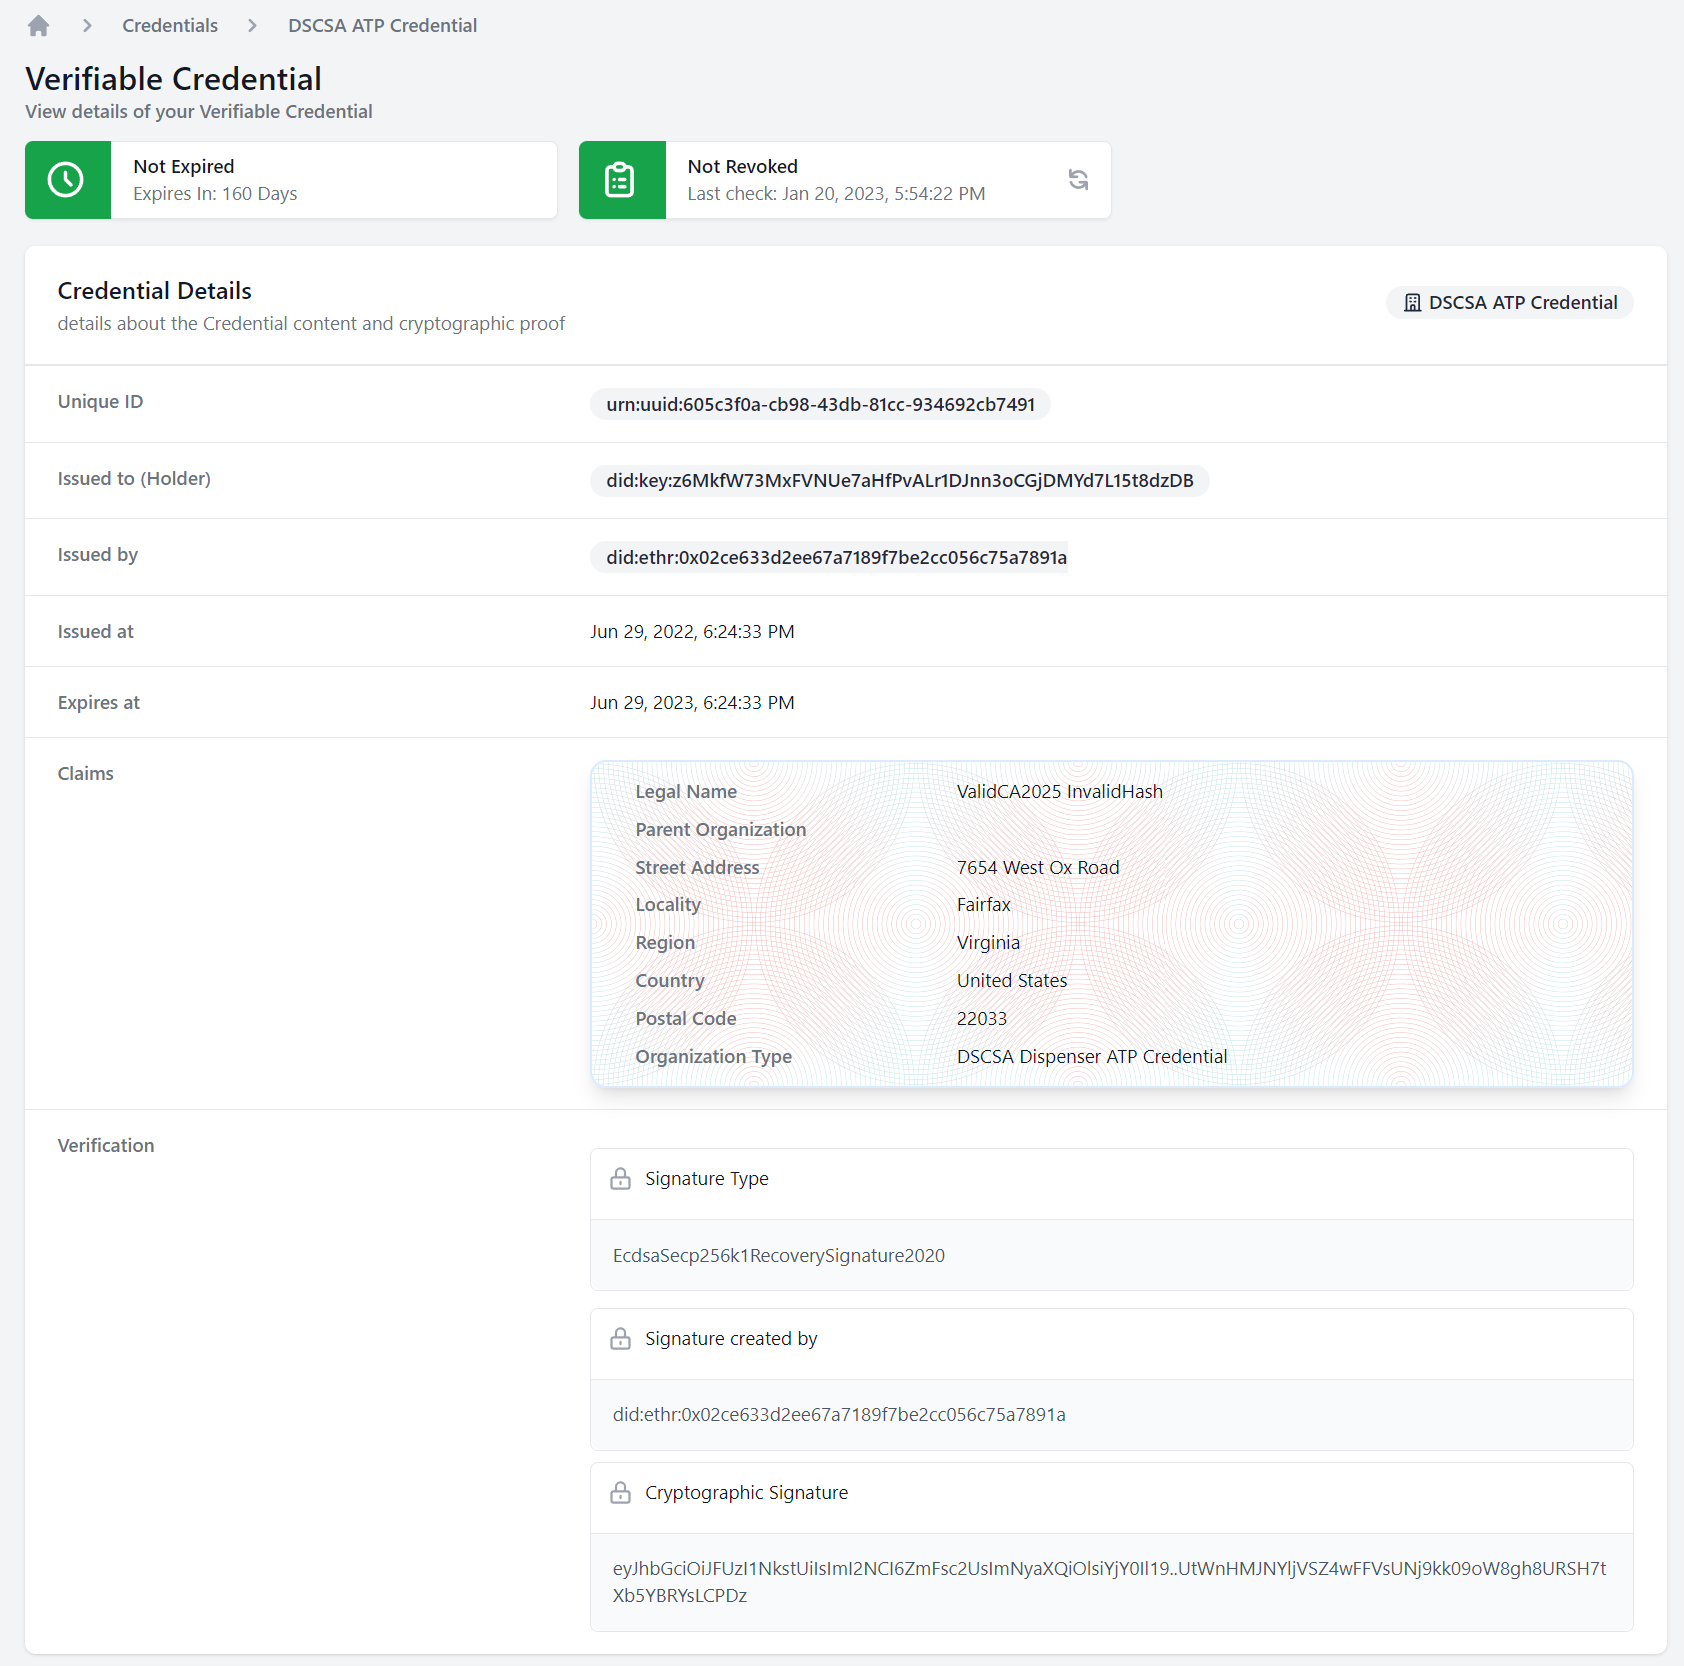
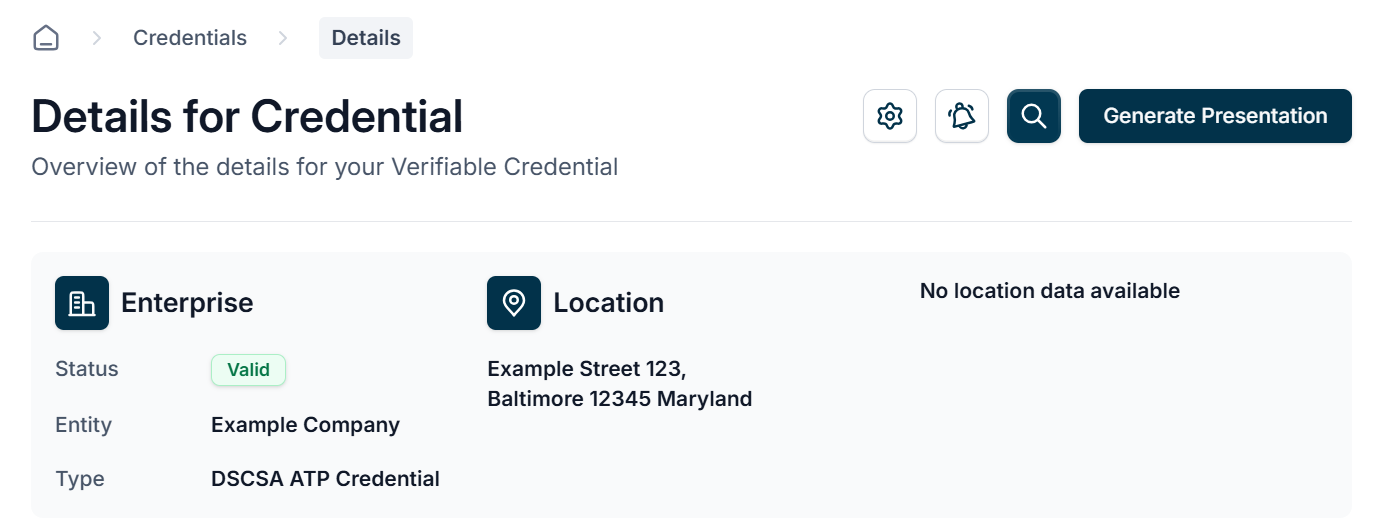
You can find your Credentials in the menu section Enterprise Wallet. This screen shows these Verifiable Credentials associated with your Enterprise Account. You can drill into the detail of credentials you already hold and check the status of any credential requests that are awaiting issuance.
Read more about credentialsCredential Details
Clicking on any of the credentials in the list will open a details view of this credential, including the results from recurring live checks.
Note that you do not need to use this screen for your first two credentials as long as you go through the simplified process using the aforementioned workflow on the Dashboard.
Step 1. After clicking New Credential on the main screen, you will be prompted to select the Enterprise Identifier underlying the new credential.
If you only have one Enterprise Identifier...
- and your new credential is to be held by the same legal entity
- and you want to manage that entity's data within the same CARO Enterprise Account,
then simply select the existing identifier.
If you are looking to obtain a credential for a different legal entity whose data you want to manage within the same CARO Enterprise Account, you would need to obtain an additional Enterprise Identifier first. Find out how to create a new Enterprise Identifier in section Adding New Enterprise Identifiers before acquiring a new credential.
If you are looking to obtain a credential for a different legal entity whose data you want to manage in a separate CARO Enterprise Account, please contact your solution provider's customer support team or us directly.
Step 2. Select the Credential Issuer. This is the organization that will perform the due diligence on the pieces of evidence you will provide as justification for your credential request. When they are satisfied that everything is in order, they will issue the credential straight into your CARO Enterprise Account.
Step 3. Select the desired Credential Type, i.e. what kind of credential you need. Note that you can only acquire specialized credentials after obtaining an Identity Credential.
Once you have confirmed your choice, you will be redirected to the user interface of the integrated Credential Issuer. There you will need to provide the requested details for the issuer's due diligence process. Find out what's needed for DSCSA-relevant credentials in our preparation guide.
Credential Request Progress
Clicking on any of the credential requests on the main screen in the credentials list will open a details view of this credential request. Here you can see how far the request has progressed through the application stages. CARO displays your completed and current stages in dark colors. Future stages are predicted based on expected next steps and are displayed in lighter shades. The actual status is revised automatically as soon as the integrated Credential Issuer sends updates to CARO.
You can resume incomplete credential requests from this screen, too. Clicking the Resume Process button will redirect you to the Credential Issuer interface.
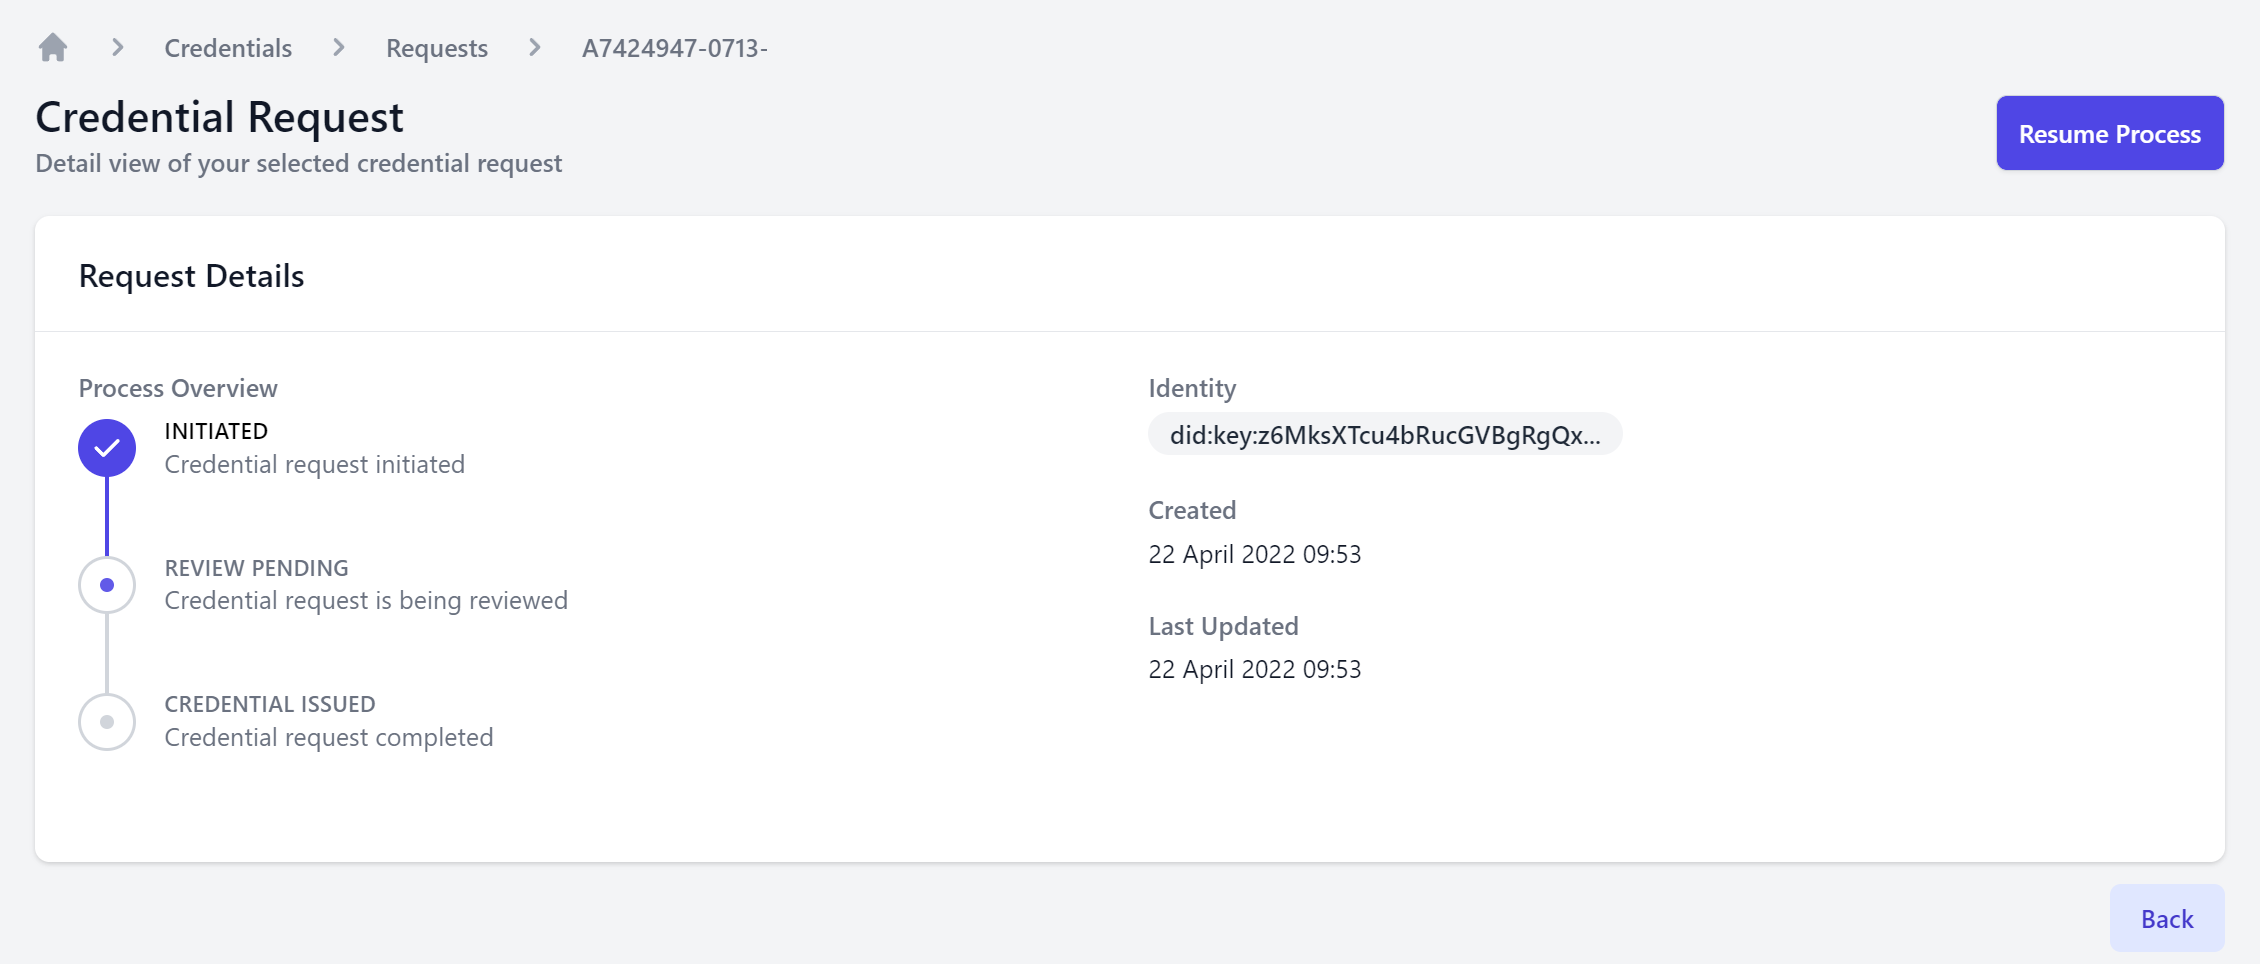
When there is a comment from the Credential Issuer, you can reveal it by hovering over the little speech bubble icon.

Normally, your VRS provider generates a Verifiable Presentation (VP) of your DSCSA ATP Credential each time they attach a credential to a VRS request or response. This all happens in the background without you needing to even think about it. However, it may be that a trading partner or authority ask you for a VP of your ATP credential. This is when you want to navigate to your Enterprise Wallet section in CARO and go to the details section of your valid ATP credential. There you will find the Generate Presentation button. Please follow the on-screen guidance.
Assign a random UUID at a click to enable the VP generation. This is a unique identifier that gets included in the VP. Then you can simply copy the text string of the VP and paste it into an email, form, or wherever else it is needed. The recipient can decode the VP using our free public OCI Verifiable Presentation Checker.
The functionality to generate a VP is also available for your DSCSA Identity Credential.
Trading Partners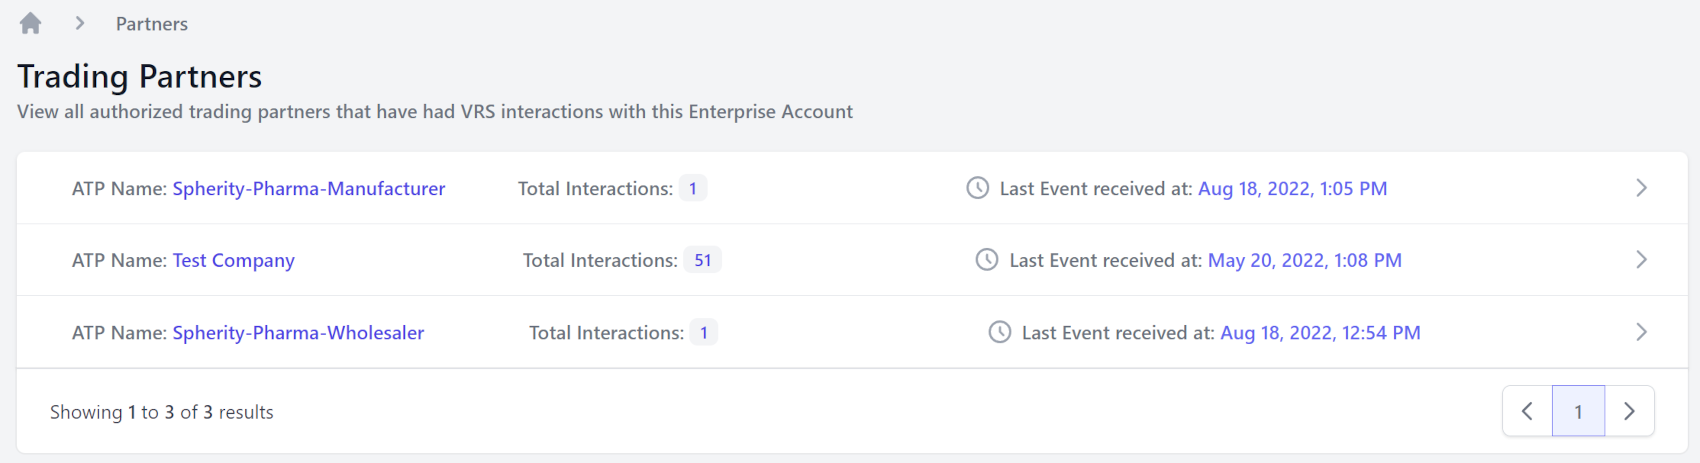
This screen shows a list of all authorized trading partners with whom VRS interactions have taken place. This view auto-populates. You do not need to add your trading partners manually.
-- Contacts --We are gradually rolling out a new feature set for trading partner master data management. Beta versions are available to our Enterprise customers. Please contact us if you are interested in learning more.
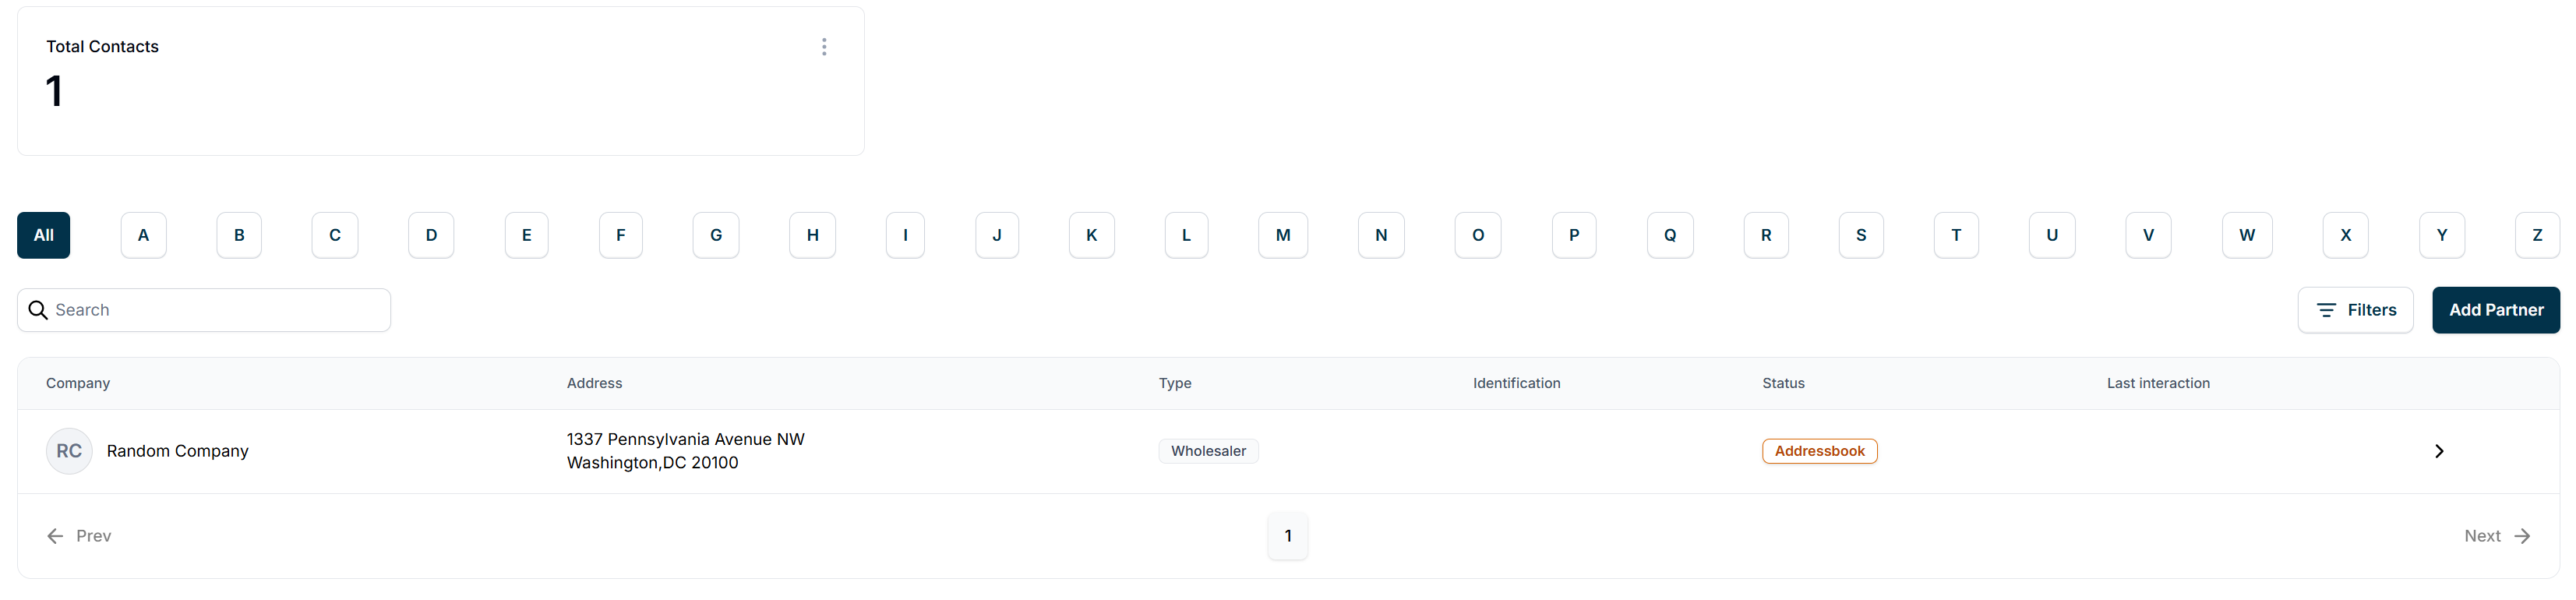
You can manage the master data of your business partners directly in CARO, even if they have not yet had any VRS interactions with you. The feature will also enable you to monitor their licenses or FDA registrations and any compatible digital credentials they may have.
Clicking on a trading partner in the overview will open a details view of this entity.
Hitting the 'Add' button opens a short form to add another entity to your contact list.
-- User Settings --Clicking on the tile with your name in the bottom left corner of the app screen opens the User Settings.
Here you can manage your profile, your own security settings, and inspect account activity logs.
In addition, all Enterprise Accounts to which you have been granted user access are listed here. You can move between accounts by clicking on the Switch button for each. You can also quit any account.

This screen shows all users who have access or have been invited to the Enterprise Account. You can remove existing users by clicking on the bin icon 🗑 or change their role by clicking on the pencil icon ✎.
Adding New Users
After clicking Send Invite in the top right corner, a small form will prompt you to enter the new user's email address and select their user role. Once you have confirmed the invitation, the new user will receive an email inviting them to set up their account access.
Available User Roles
Admin
- Enterprise Account Administration
- User and role management
- Credential management
Credential Manager
- Credential Requests
- Managing existing credentials
Auditor
- VRS Event Monitoring
- VRS Event Investigation
This screen lists the actions account users have performed in your CARO Account.
Credential Issuer User Guide
CARO User Guide for Credential Issuers
This document walks you through the functionalities of the CARO app, Spherity's Credentialing Service for Authorized Trading Partners (ATP), to enable you to navigate the user interface. It does neither explain any technical details of the Credentialing Service nor provide guidelines for the technical implementation of CARO. Please refer to our API Specifications for technical guidance.
This document will be updated continuously. Please check back frequently, as new features and functionalities will be added to the application and explained here.
Development Status
The current application is a production version, which is continuously being developed further.
We would love to hear your feedback. Which functionalities or info screens are useful to you? What should we add or remove? How can we make your life easier? Please get in touch through one of the means detailed at the bottom of this page.
System-wide Search
The search function applies across the CARO app. It groups results into applicable categories, such as reports, events, or credentials. You can access it by clicking on the magnifying glass icon 🔎 in the top right corner of the app screen or by using the keyboard shortcut CTRL+K.
Clicking on the cogwheel icon ⚙️ in the top right corner of the app screen opens the global application settings. Here you can manage the security settings that apply across the entire Enterprise Account. You can check which service providers are integrated with your Enterprise Account. You can also find helpful links.
-- Enterprise Wallet --
Profile
You can find your profile in the menu section Enterprise Wallet. Edit your profile as you want it to appear in the CARO network.
You can find your Enterprise Identifiers in the menu section Enterprise Wallet. This screen shows your Enterprise Account's decentralized identifiers (DIDs). Each Issuer Enterprise Account must have at least one such Enterprise Identifier because having a unique DID assigned to your enterprise is a prerequisite for credential issuance. This DID is persistent. This means it will never change within the system so that it continuously identifies the particular enterprise to which it had been assigned originally.
Adding New Enterprise IdentifiersGenerally, CARO automatically creates your first DID as part of the initial onboarding process. Should you require more DIDs, you will need to create a new unique DID per additional enterprise.
It is important to note that any actions linked to any of the DIDs in the same Enterprise Account will be visible to all users with the respective user-level permissions within this Enterprise Account. If you wanted to keep the interaction records of particular enterprises separate, you would need to create a new separate Enterprise Account instead. Please contact us to explore which option is most suitable for your situation if you are unsure.
After clicking New Identifier on the main screen, you will be prompted to give your new DID a meaningful name and select a method to create this identifier, a so-called DID method.
If all you want is to create a DID for a real enterprise, simply select one of the first two options (did:ethr with/without HSM). HSM means 'Hardware Security Module'. CARO uses a cloud-based version, which provides enhanced security by preventing extraction of your private keys. You can have no more than 1 HSM-backed DID in your CARO Enterprise Account.
If you are interested in experimenting with CARO, select any of the DID methods in tab Testing Identifiers. Please contact us if you want us to join your experiment or to discuss your needs.
Once you have confirmed your choice, you will see your newly created DID listed.
This screen shows a list of all customers who have granted you access to their account.
Customer Details
Clicking on any of the customers in the list will open a details view of this customer. Besides some basic information, it includes a list of their Enterprise Identifiers.
Issued Credentials
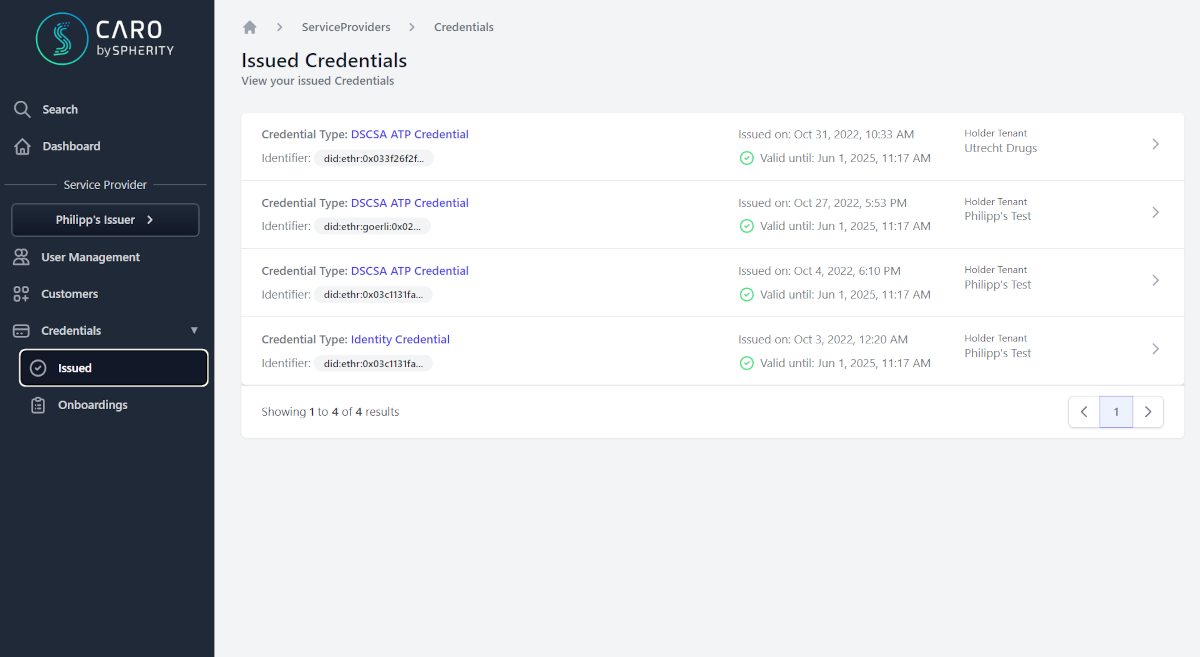
This screen shows a list of all Verifiable Credentials you have issued from this CARO account.
Clicking on any of the credentials in the list will open a details view of this credential.
Onboardings
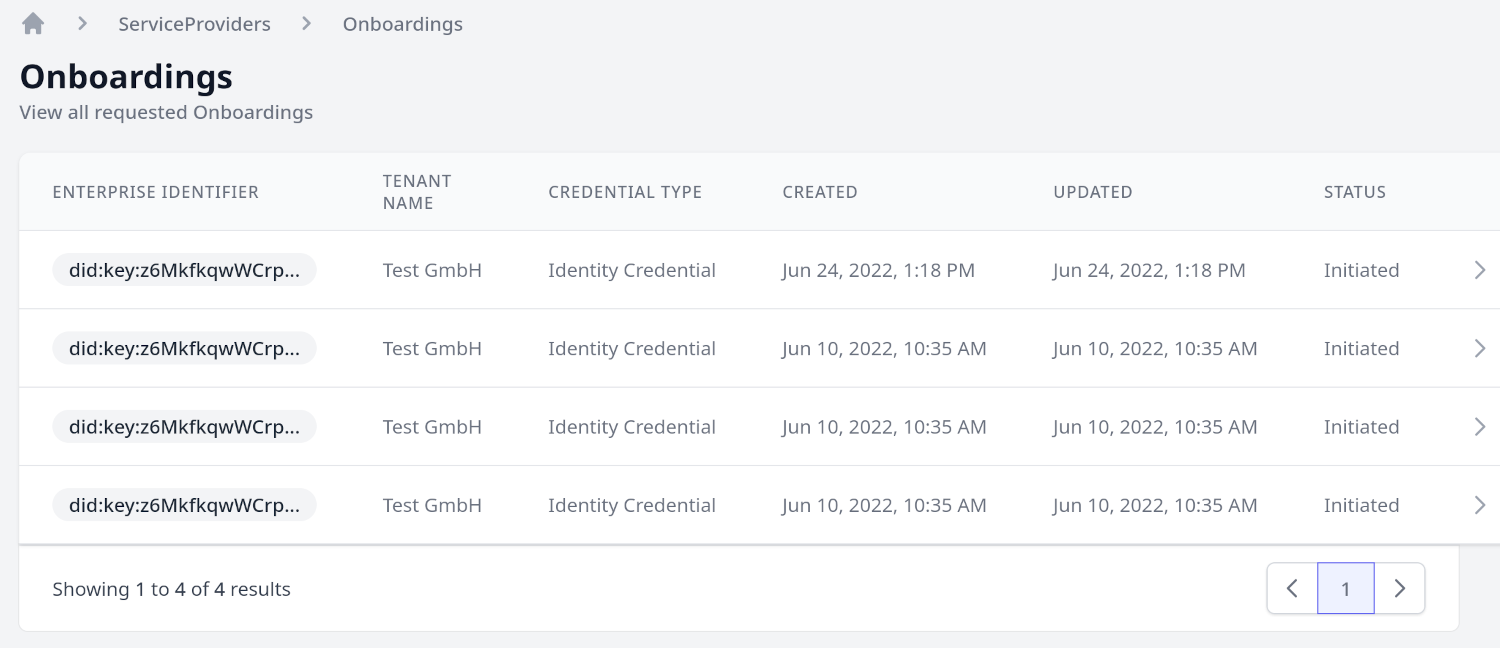
This screen shows a list of all onboardings.
CARO manages credential requests through so-called Onboardings. One Onboarding is effectively mapped to the lifecycle of one Verifiable Credential. For example, a credential may need to be re-issued after expiry. Both steps, initial and subsequent issuance would be mapped against the same onboarding ID.
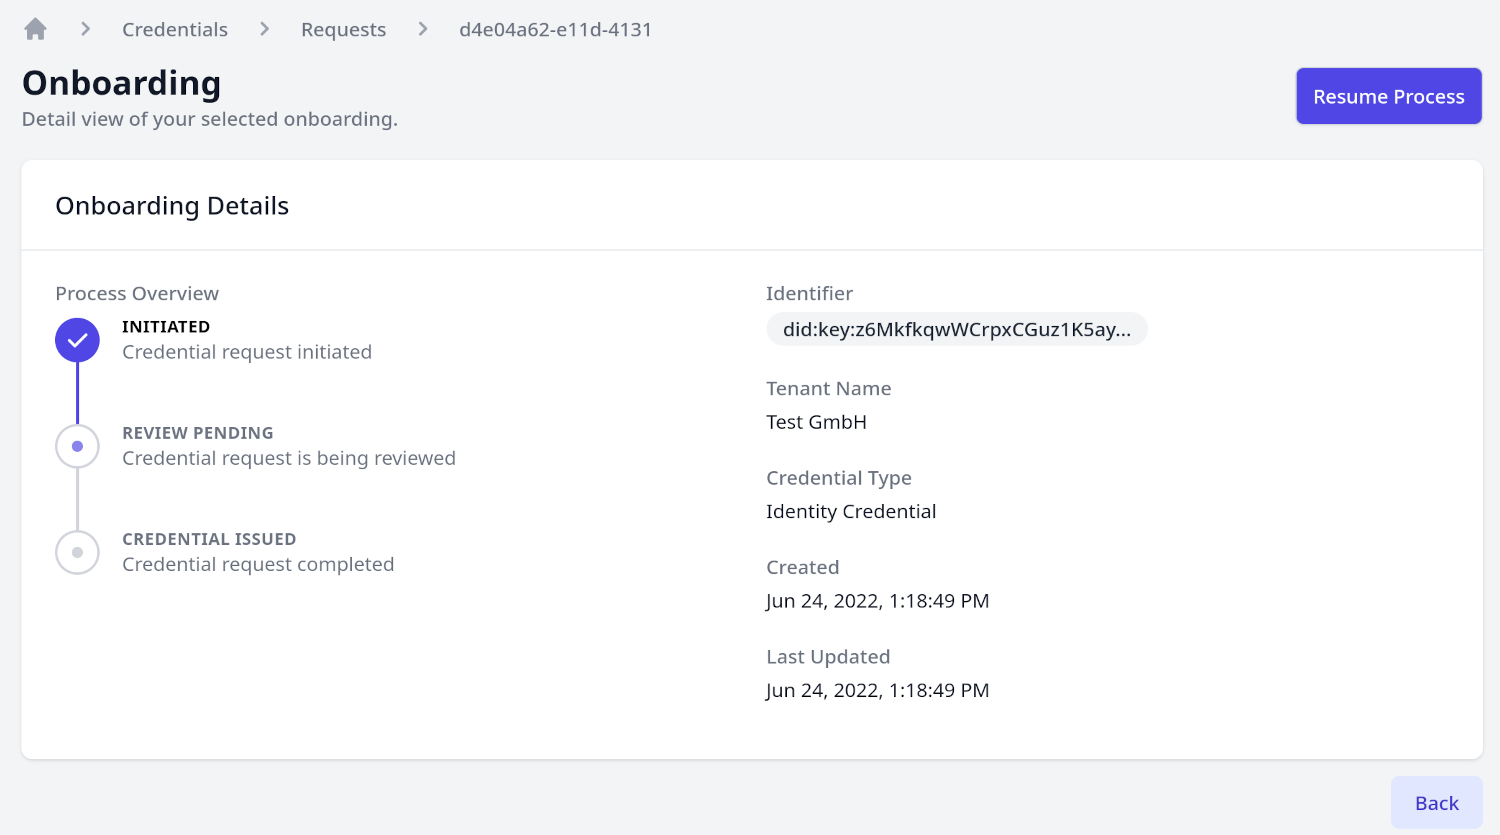
Onboarding Progress
Clicking on any of the onboardings in the list will open a details view showing the progress of the credential request.
Here you can see your API token usage, manage your API client keys, including key rotation, and access other developer tools.
Clicking on the tile with your name in the bottom left corner of the app screen opens the User Settings.
Here you can manage your profile, your own security settings, and inspect account activity logs.
In addition, all CARO Accounts to which you have been granted user access are listed here. You can move between accounts by clicking on the Switch button for each. You can also quit any account.
This screen shows all users who have access or have been invited to the Enterprise Account. You can remove existing users by clicking on the bin icon 🗑 or change their role by clicking on the pencil icon ✎.
Adding New Users
After clicking Send Invite in the top right corner, a small form will prompt you to enter the new user's email address and select their user role. Once you have confirmed the invitation, the new user will receive an email inviting them to set up their account access.
Available User Roles
Service Provider Manager
- Administration of Service Provider space
- User and role management
Service Provider Developer
- as Service Provider Manager + access to client ID and secret for authentication
This screen lists the actions account users have performed in your CARO Account.
Whitelist Guide
Why would I need to whitelist?
CARO is a web-based app. If CARO does not work, for example you cannot access the onboarding page, then it may be that your IT system does not permit access to certain [URLs][u] that CARO requires. These URLs need to be whitelisted (allowed) by your IT system for CARO to be fully functional.
In addition, your email provider may block CARO’s service emails. This would result in you not receiving app notifications or invites to get started with CARO or join other accounts.
CARO not working properly?
Please troubleshoot the issue as follows with your own IT team:
- Is there a proxy server configured on your computer?
- If there is a proxy server configured, please verify the following [domains][u] are allowed:
Spherity-managed
| Domain (URL) | What is it? | You should see… |
|---|---|---|
| spherity.com | General Spherity domain | Spherity’s corporate website |
| caro.vc | General CARO domain | our dedicated CARO website |
| api.caro.vc | Subdomain for CARO frontend | your dashboard if already logged in |
| auth.caro.vc | Authentication service for CARO-related apps | the CARO app log-in (automatic re-direct from frontend) |
| caro-prod.us.auth0.com | Authentication service for CARO-related apps | the CARO app log-in (automatic re-direct from frontend) |
| api.caro.vc | Subdomain for CARO backend | n/a |
| https://*.ingest.sentry.io (whitelist all subdomains) | End user tracking tool for troubleshooting | n/a |
Legisym-managed (integrated credential issuer)
The following sites are owned by Legisym, LLC and are used during the credentialing process with Spherity Inc. The sites allow the user to provide data to Legisym for due diligence. Legisym reviews the data to determine if credentials can be issued.
| Domain (URL) | What is it? | You should see… |
|---|---|---|
| test.credentialsolutions.com | Credential onboarding page for testing | a log-in screen if accessed from outside of CARO or a data entry form if accessed from inside of CARO |
| credentialsolutions.com | Credential onboarding page | a log-in screen if accessed from outside of CARO or a data entry form if accessed from inside of CARO |
- To check that all required domains have been whitelisted, please try to open them.
- If any domain is still blocked, please follow your internal process to unblock it.
CARO emails not arriving in your inbox?
First of all, please check your spam folder.
If there are no CARO emails to be found anywhere in your mailbox, add [email protected] to your trusted email address list. Ask your IT team if needed.

Support & Feedback
Please contact [email protected] for product-related questions or feedback, or [email protected] for technical queries.
Interactive chat
Inside the CARO app you'll find a chat bubble symbol. Use this to report bugs or start a conversation with us straight from wherever you are in the app. You can also reach this message tool from outside of the CARO app at help.caro.vc.
Slack for integrators
We offer a dedicated Spherity Slack support channel to our integrators. Seeking assistance or offering feedback there will be one of the most straight-forward ways for you to reach the CARO team.
App Status Monitor
The app status, including maintenance updates, can be found at https://status.caro.vc/.
You can also subscribe to updates via RSS: https://status.caro.vc/rss.